Making a map from scratch: how hard can it be?

ohlidalp

Infamous Developer
Administrator
Developer
Hello.

I decided to try to create new terrain from scratch, just to see how much time it takes if you don't try too hard.
I'll call it "Quick & Lazy"
I'll go for a tiny, like 600x600meters, meshed terrain because I can't work with any heightmapping tools, but I can work with Blender (although I'm rusty).
And I'll document the steps as I go because I don't really know what I'm doing, so it may end up a good "what not to do" post :) Also I'd really like to create a step-by-step terrain creation tutorial in Blender, wish me luck!

Step1: pick Blender version. Last time I checked their website, Blender 3.x was still beta. Now, the download page presents you 3.3.1 LTS, so I'm going with it.

step 2. copypasted https://docs.rigsofrods.org/terrain-creation/terrn2-subsystem/#terrain-2-terrn2-file-format and made minor edits. I save it to "Documents\My Games\Rigs of Rods\mods\_projects\quick_and_lazy\quick_and_lazy.terrn2" so that I can later edit and directly reload in game.

step3. Open blender, rename the default cube to Footbal and set size to an average soccer pitch (press N for the side menu, then enter the sizes), https://en.wikipedia.org/wiki/Football_pitch - for a sense of scale. Blender measures in meters. OGRE measures in raw numbers, but ROR's convention is that 1.0 = 1 meter.
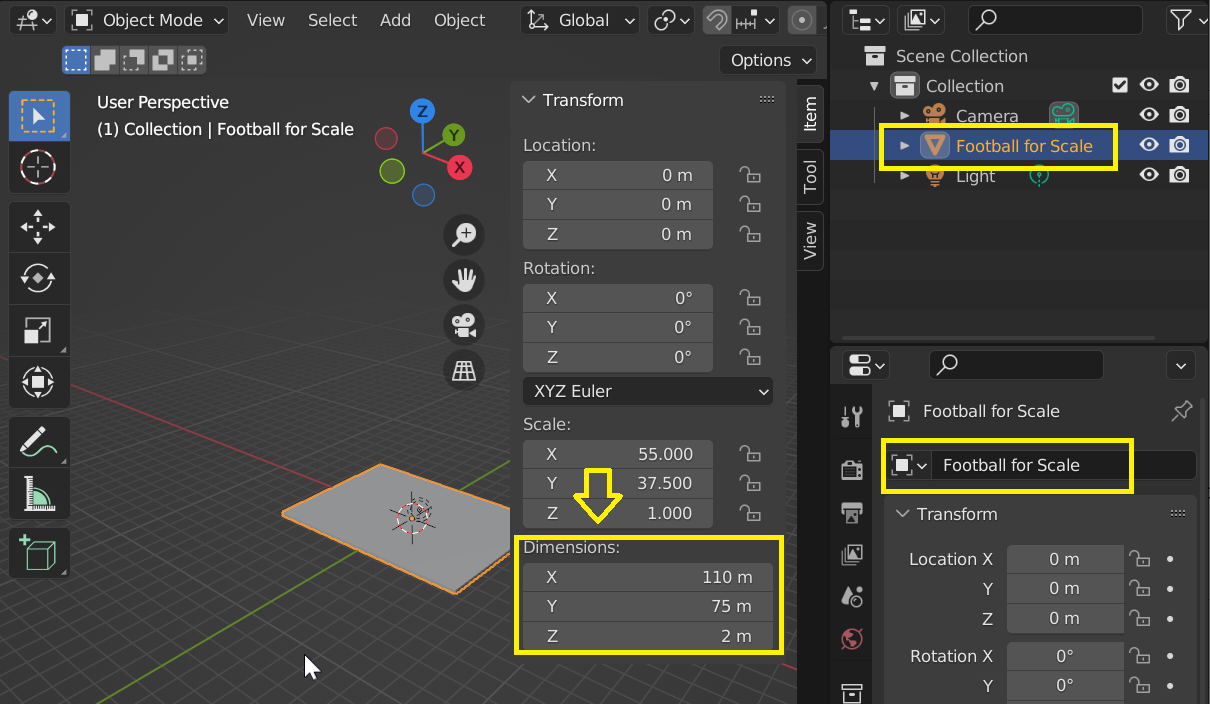
footbalForScale.png


step4. create ground plane.
A: Go to top menu Add>>Mesh>>Plane.
B: TAB to edit mode. This is critical! In Blender you can use the same scaling hotkey in ObjectMode, and it looks all the same in the 3DViewport but you're not editing the mesh, just the bounding box! Many people have been baffled why their exported meshes have bad sizes because at some point in time, they scaled in ObjectMode.
C: Use S hotkey to scale
D: TAB to ObjectMode to see the scale. Repeat until it's roughly what you want.
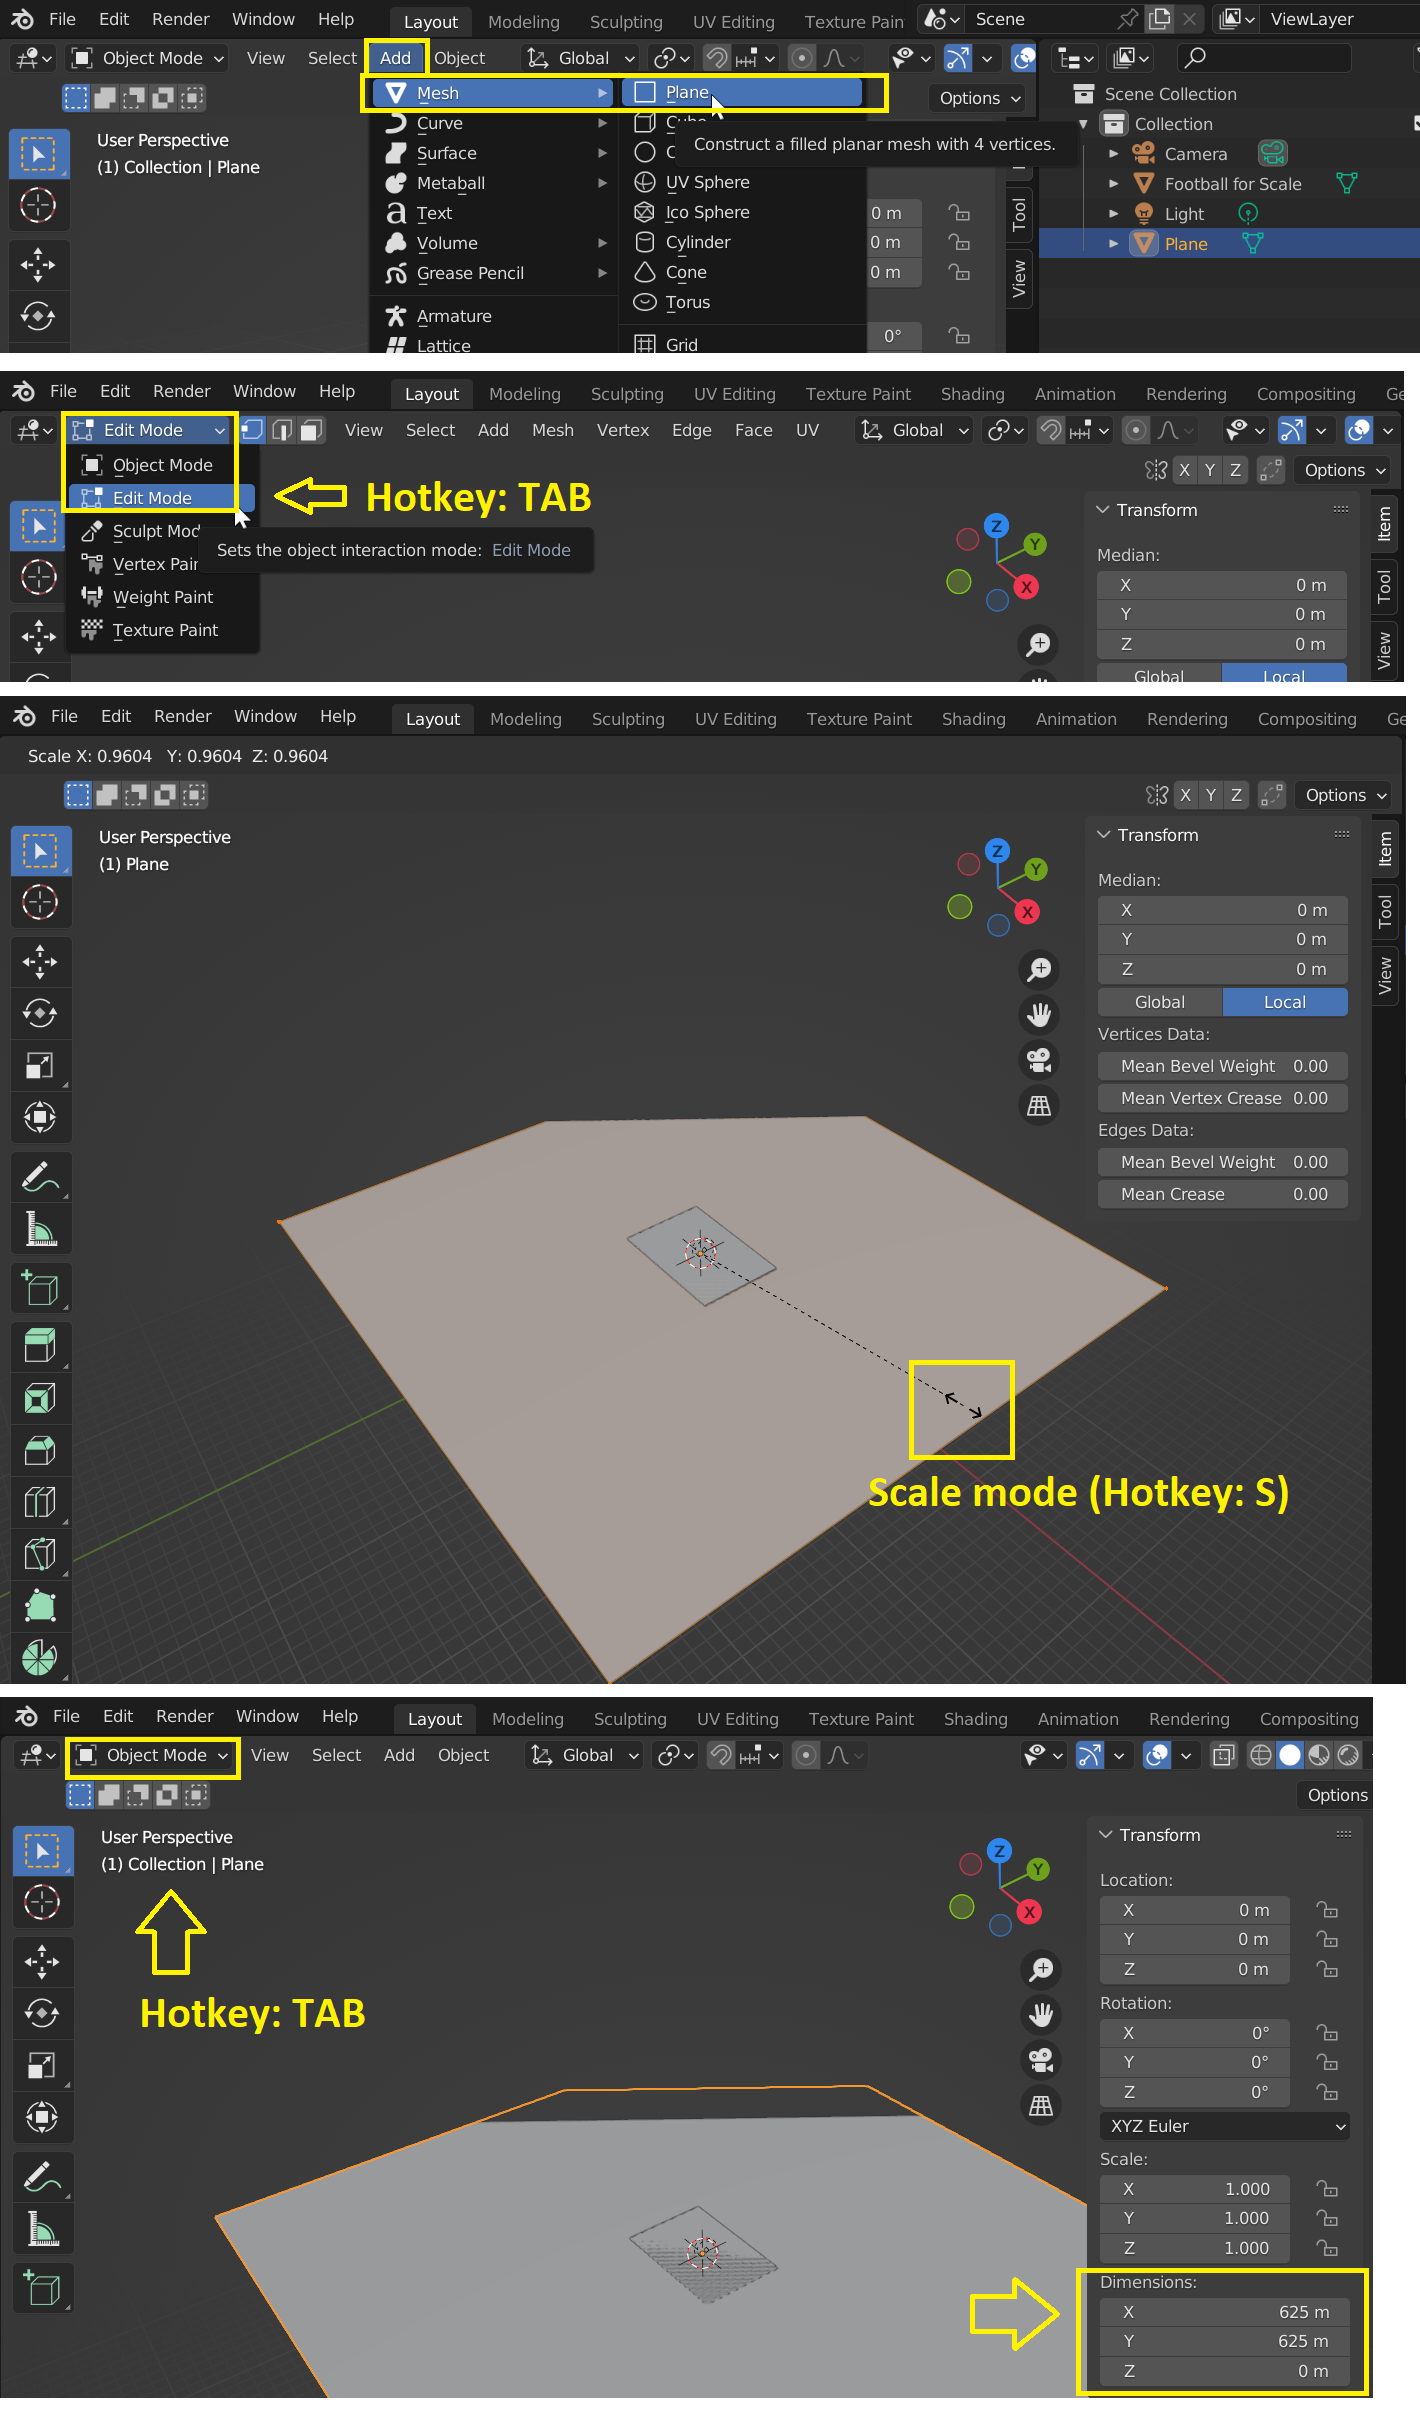
02 blender plane.png


step5. As you can see, the ground plane is clipping in the distance. This was a surprise for me, but quick googling helped: https://blender.stackexchange.com/a/16583
03 blender clip.png


step6. Adjust the resolution of the ground plane. It should be doable with MultiresolutionModifier, but I decided to manually Subdivide. Make sure you're in EditMode and you have the mesh selected (orange outline). If you lost the selection hit A hotkey to select everything. The Subdivide tool only lets you do 10 cuts, so repeat until it's roughly the resolution you want. There's no point in trying to be precise now, the ground-shaping process will move and scale the triangles in all directions.
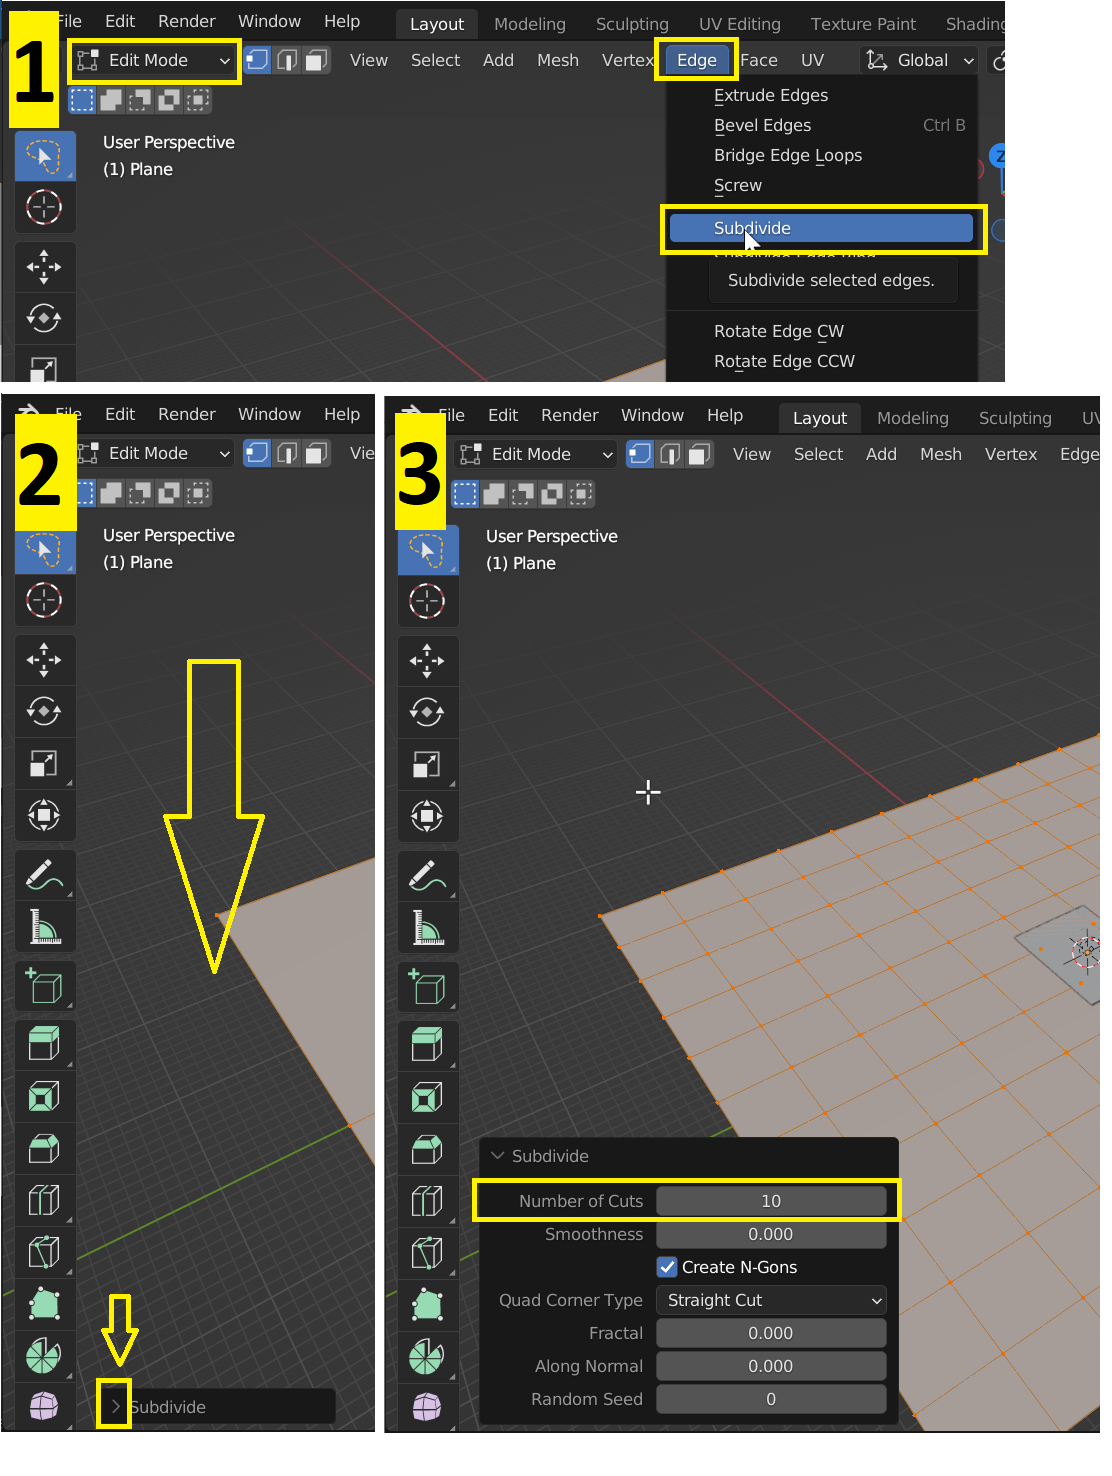
04 subdivide.png

I wanted one quad to be circa 0.5x0.5 meters, so with ~600x600m ground plane, I made 9 cuts for 60x60m quad, then 2 cuts for 10x10m quads, then 9 for the final precision.

step6. Align the geometry the way game expects it. Game map has origin (XYZ 0,0,0) in one corner and all cords are in the positive space. However, Blender by default adds meshes with origin in the middle. There is a way to set origin position using 3D cursor, but I want the origin to match the colored axes in Blender, so I'll move the terrain mesh.
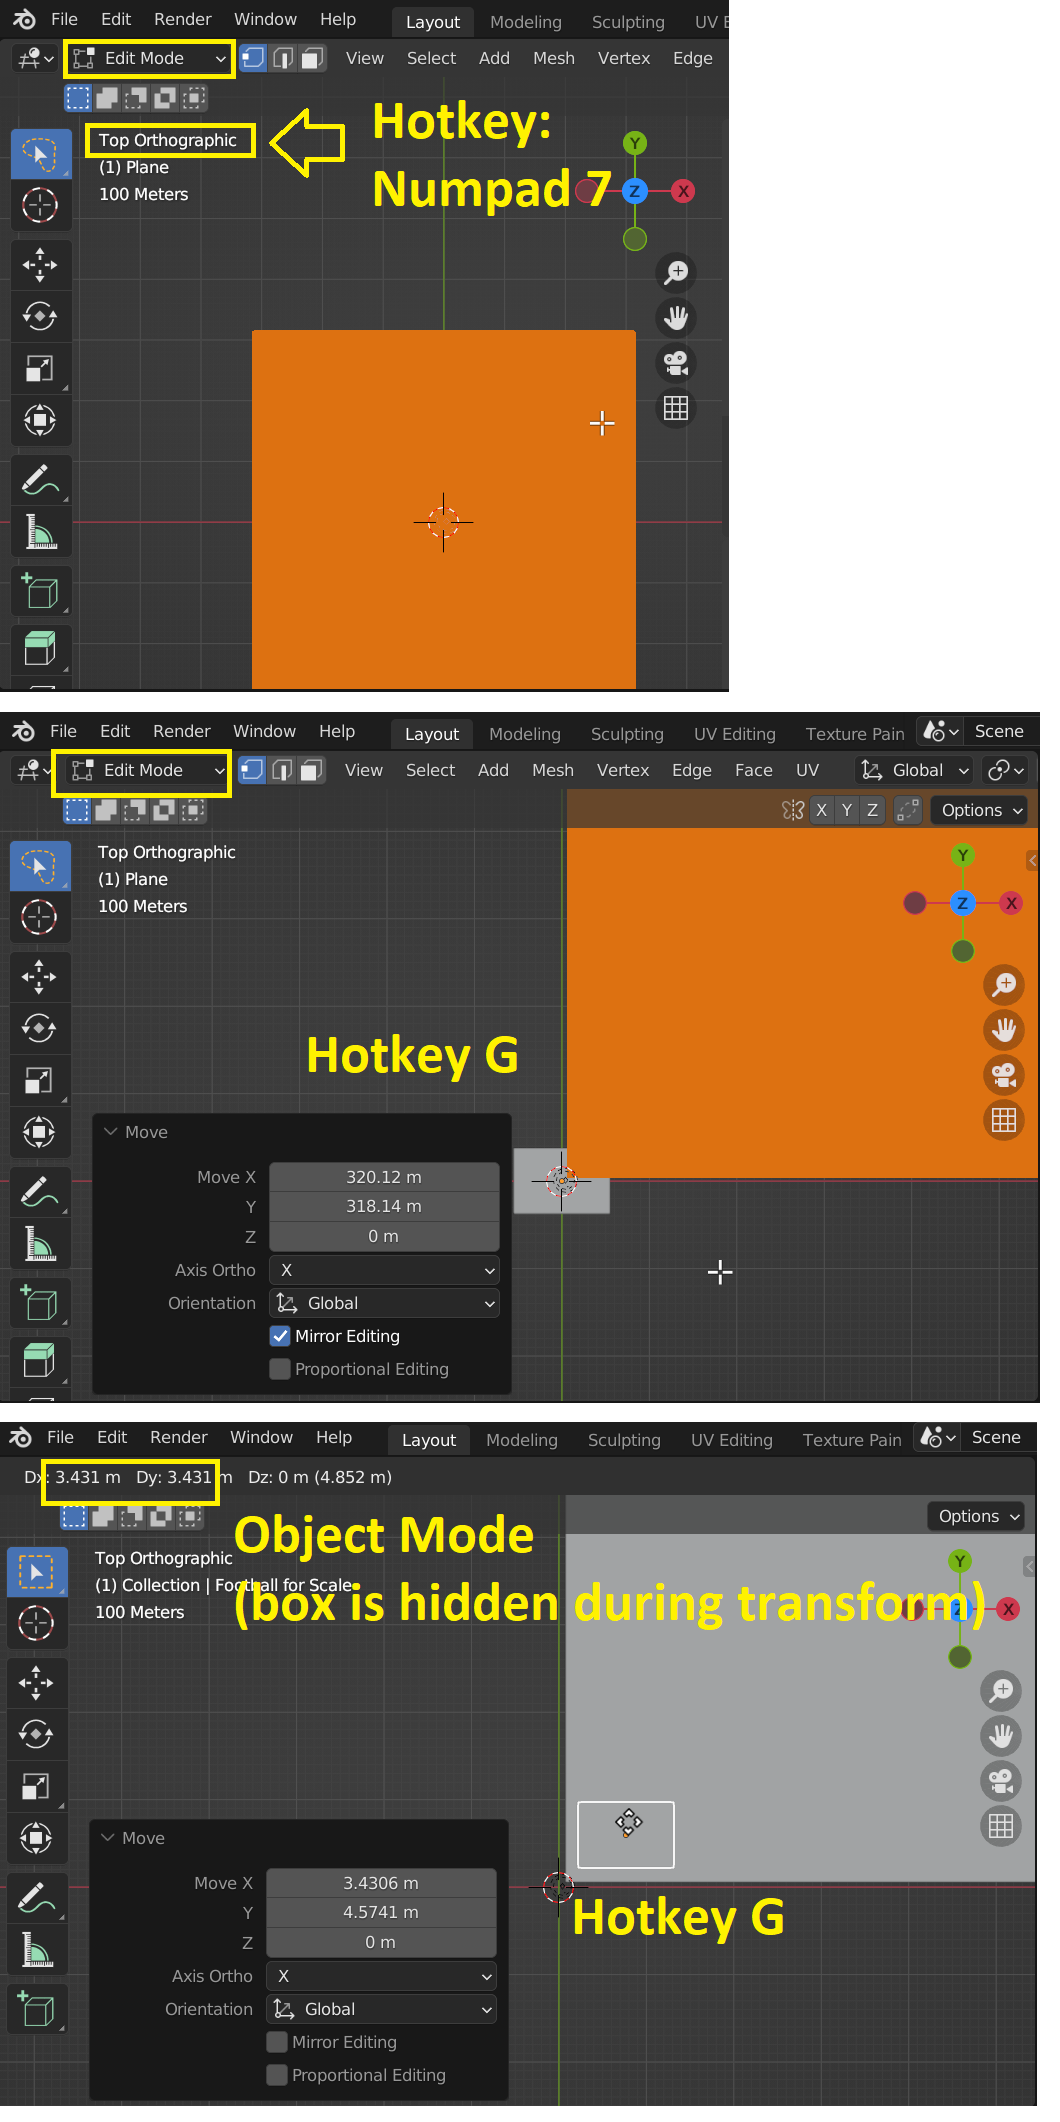
06 blender origin points.png

Note that the "Footbal pitch" mesh won't be exported to the game, it's just an utility mesh in Blender. The terrain will contain a footbal pitch, but I'll remake it clean as part of static geometry mesh.

step7. Let's move the FootbalPitch object (remember, in ObjectMode, we're not moving the Mesh, but the Object!) up a little, so it doesn't visually glitch and stays visible even if accidentally terraforming too close. Hit numpad 5 to toggle between perspective and orthographics mode. Align camera using mouse and middle button. Then hit G for GrabMode and Z to constraint the movement to the Z axis. Then move mouse to position the object.
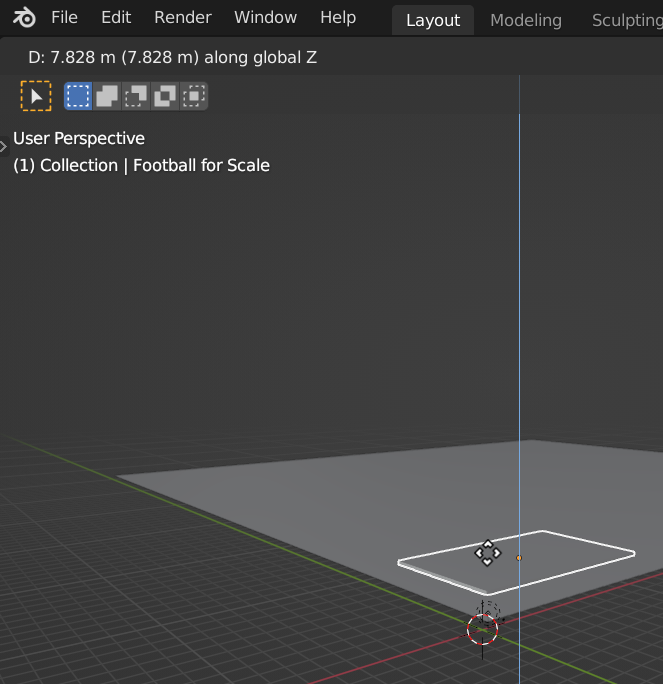
07 grabmode Z.png


step7. Enter SculptMode and start shaping the terrain using the tools on the left. Notice that when you go back to EditMode, you can see the quads change shape and position, often in a way you don't like. Learn which tools are safe and which make a mess. Use classic Ctrl+Z to undo.

step 8. To create base shape of your terrain, use Clay tool - it simulates how blobs of clay are added/removed to the base shape. Hold LMB to add clay to the ground. Hold Ctrl+LMB to remove clay from the ground. Hotkey F toggles brush scale mode - just move your mouse to adjust brush size and then click LMB to accept.
The screenshot below shows what I did just with the Clay tool. At this point I started thinking what will the map contain - it will be a very rural landscape, the outskirt of some village. I figured the Blender's grid display is a good indicator for water plane, so I hijacked it that way.
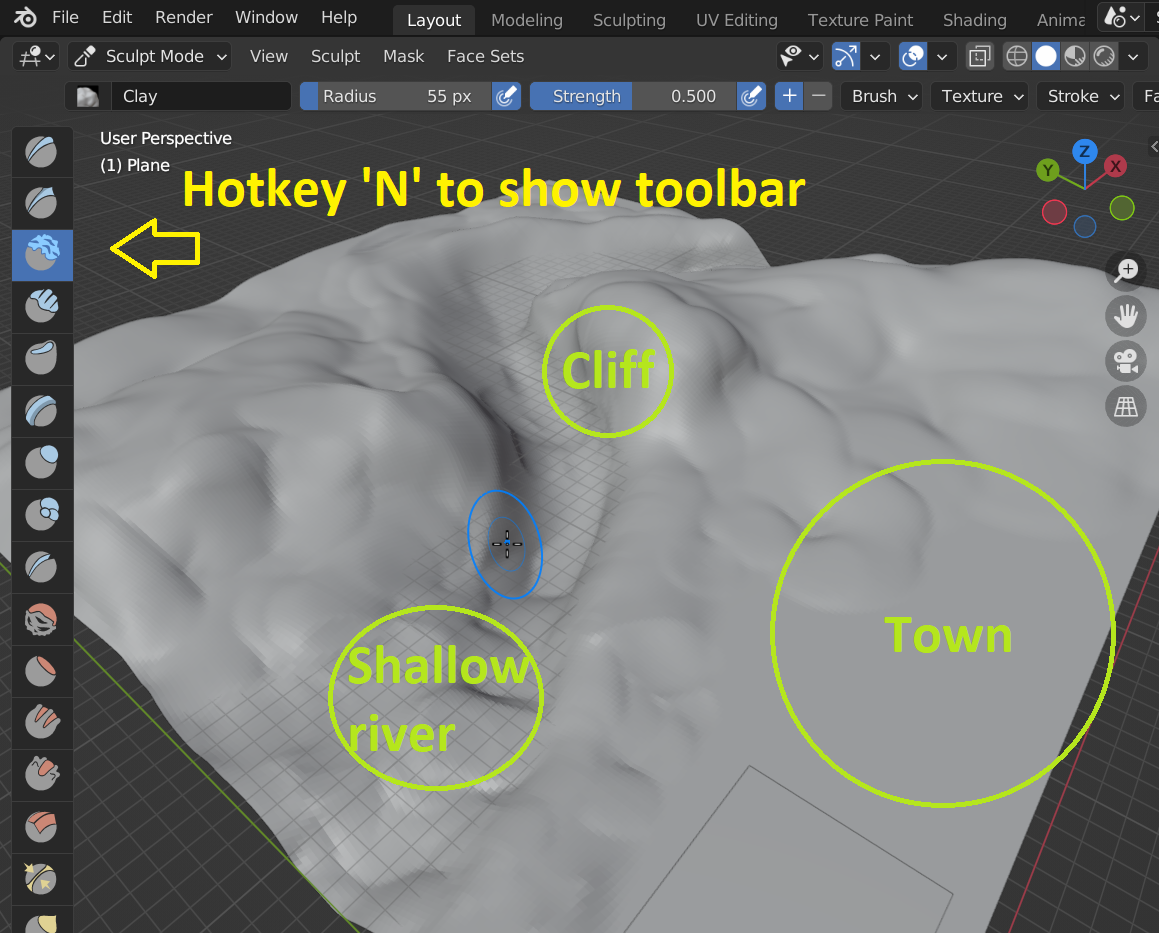
08 sculpt Clay.png


step 9. Another great tool is Crease. It's fantastic for terraforming because it works like erosion does in real life. I set the strenght to roughly 0.5 and I sculpt from tops of hills/mountains down to simulate how water erodes the ground. Or I hold Ctrl and go bottom up to roughen the land as if hard rocks were under the ground.
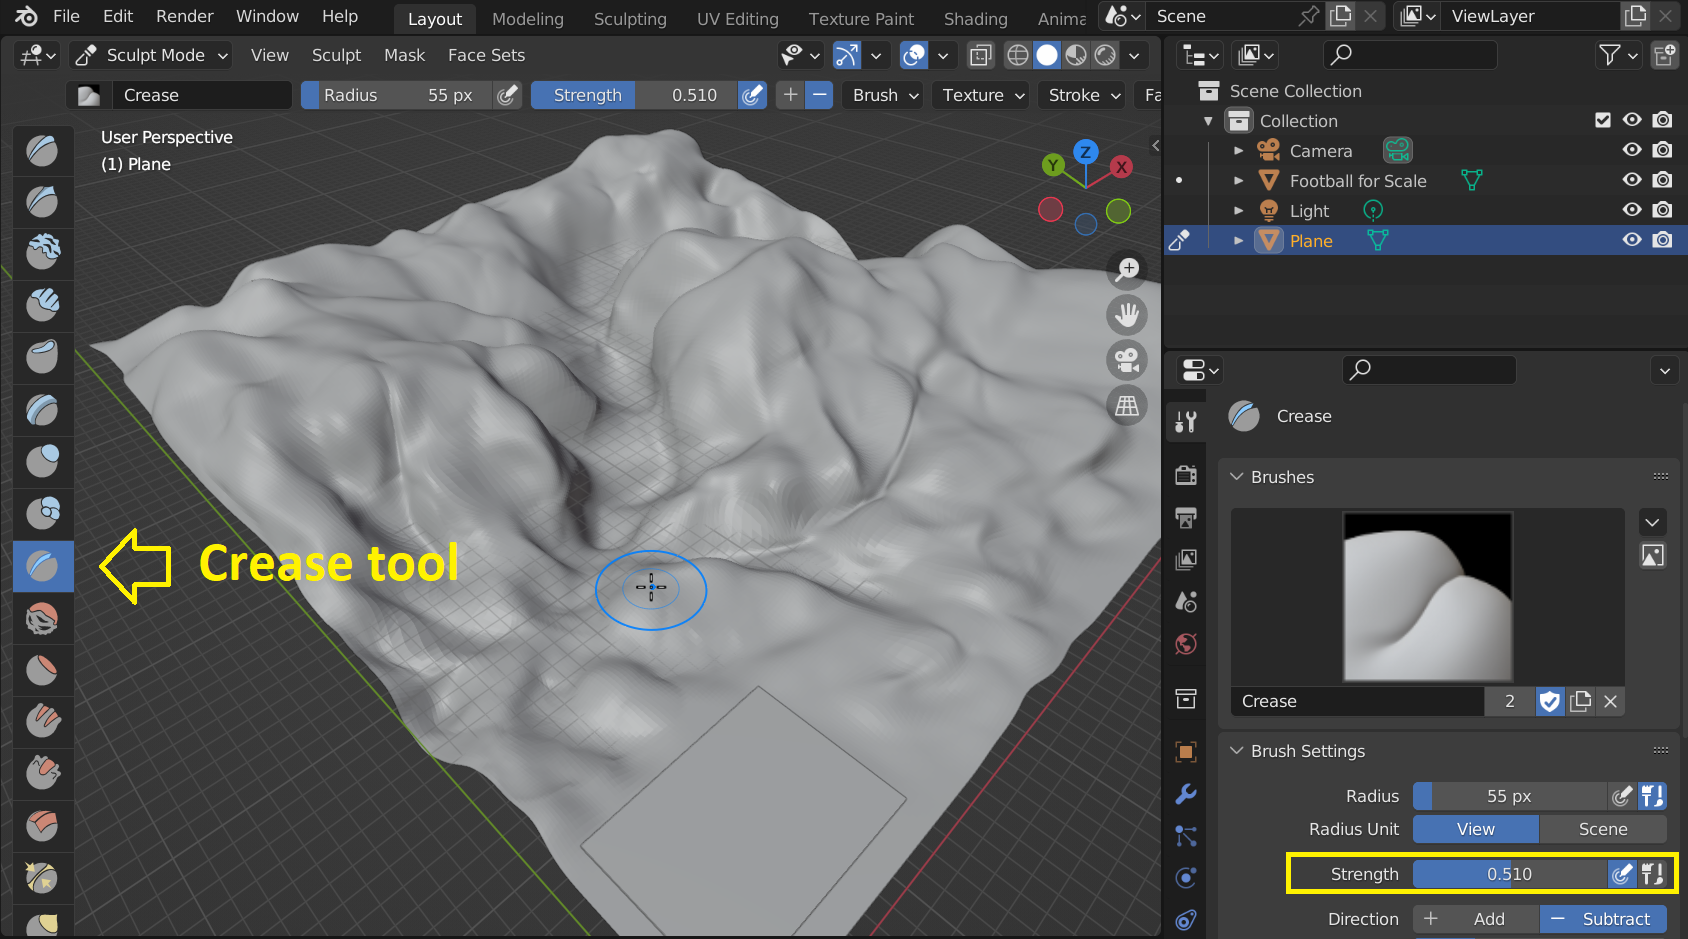
09 Blender sculpt Crease.png


To be continued in next post.
 
step10. Finally let's clean up the mess using the Smooth tool
10 Blender sculpt smooth.png


step11. Time to plan roads. Roads will be meshed separately but now it's the time to figure where they will go and use the Flatten tool to prepare the ground.
11 blender sculpt flattten.png


step12. Time to test the mesh in game. We'll install https://github.com/OGRECave/blender2ogre.
Download the latest release: https://github.com/OGRECave/blender2ogre/releases/tag/v0.8.3 - click the SourceCode link below, it's a ZIP archive. Put it to Downloads folder.
Follow the instructions: https://github.com/OGRECave/blender2ogre#installing
12 install blender2ogre.png


That's it for today, I don't have time left for the actual export but the blender2ogre util has excellent docs. Let me know if you followed the steps and what you created.
 
step13. configure blender2ogre addon
manual: https://github.com/OGRECave/blender2ogre#installing
Note that you need to have Rigs of Rods installed to get the necessary tools.
13 config blender2ogre.png


step14. rename the object and mesh - OGRE exporter will use the mesh name (the green triangle icon)
14 Blender rename object and mesh.png


step15. Perform the export.
15 Blender export ground.png


step16. To get the mesh in the game, we need to create an ODEF file (static terrain object, see https://docs.rigsofrods.org/terrain-creation/object-format/) and enlist it in an TOBJ file (terrain objects, see https://docs.rigsofrods.org/terrain-creation/editing-terrain-objects/) and that in turn needs to be enlisted in TERRN2 file.
UPDATE: without OTC file water won't load and collisions won't work.

16 ROR tobj odef terrn2.png


step17. Finally test in game.
I got this result - the terrain mesh is outside the black "WaterBottom" which indicates an area where collisions work. I need to investigate what hapenned because I need the coordinates in Blender to be equivalent to later game coords, I don't want to hack thigs around.
17 game test - black water bottom outside.png
 
Last edited:
.....
step17. Finally test in game.
I got this result - the terrain mesh is outside the black "WaterBottom" which indicates an area where collisions work. I need to investigate what hapenned because I need the coordinates in Blender to be equivalent to later game coords, I don't want to hack thigs around.
Just a guess, but before exporting did you apply location/scale/rotation by pressing CTRL+A while the terrain mesh is selected in object mode? That's usually the cause of incorrect model placement.
blender_2022-10-23_20-18-41.png
 
Just a guess, but before exporting did you apply location/scale/rotation by pressing CTRL+A while the terrain mesh is selected in object mode? That's usually the cause of incorrect model placement.
Good guess but I'm well aware of this catch and I was careful not to do any object-mode transformations. There's a warning about this at step4.

Anyway this is good to note to Blender users: If you've been careless and you've made some object-mode transforms (position/rotation/scale) mixed with edit-mode transforms, you can press Ctrl+A to bring up "Apply" menu and then select "All Transforms".
 
step18. Fix the mesh placement. After some testing I concluded this is an oddity in the game and I must work it around. Correct me if I'm mistaken.
First, make sure you always export with the "Swap axis" set to "xz-y" aka "ogre standard".
Second, add -90 degree rotation to the TOBJ line, see the screenshot.
Tip: use the game's top menubar to reload the terrain on the go.

18 corrections - collisions are working.png


step19. I added an extra plane to visualize water level. The grid wasn't clear enough for the job.
1. add new plane from the top menu, like before
2. move it using grab mode (hotkey G, plus X/Y/Z keys to constrain movement to one axis) and scale it using scale mode (hotkey S, the same X/Y/Z keys apply).
3. add a material to it. Select the Material tab and click Add new.
4. Scroll down on the options until you find "Viewport display" box. Click the color box and use color picker.

19 blender water plane.png


step20. Create road mesh. We'll model roads by creating a textured road segment and then repeating+bending it along a spline. To create the mesh:
1. add cube from top menu.
2. switch to Edit mode on it, press numpad 7 for top-view, then G for grab mode and position it so that it starts at the X axis (red line, see the gizmo)
3. activate Face select on top menubar, select the bottom, front and rear face, press DELETE for the delete menu and select Faces. This gives us a basic road mesh with surface and edges.
4. now we want to 'flatten' the road mesh. To do it, we must either scale the mesh or select vertices and move them around. Let's do the latter. Activate the x-ray option on top menubar so you can select all vertices, even those behind an object. Press numpad 1 for front view, hotkey B for box-select tool, select the verts you need.
5. Use grab mode to position the vertices near the X axis
6. now we want to widen the base of the road. With the bottom nodes selected, use Scale mode (hotkey S) with constraint on X axis (hotkey X) and scale it as you want.
7. almost done except the segment is too long. This time let's use the scale mode. But we don't want to scale around the center of the segment, but around the origin point. To do it, set pivot in the top menubar. Then the scaling will only work in the direction we need.
8. now the segment is too short to contain the dashed white line. Let's double it's length by extruding. Select only the vertices at the end of the segment, then press E for Extrude. This puts you grab mode - use Ctrl to position it nicely.
20 blender roadmesh cube.png


step21. Add texture to the road segment. In Blender, this means to define texture coordinates (aka UV coordinates in Blender) - this is called Unwrapping. Second we must create a Texture datablock. Finally we must add a material to map the texture onto the mesh.

1. change to UV Editing tab. In the UV Editor window, you'll see there are texcoords already, just quite random.
2. perform unwrap - Blender is very good at auto-aligning the texcoords to make sense.
3. create a texture. Name it something sensible.
4. try out the texture painting. It will work in the UV Editor window, but when you try in the 3D viewport, it'll complain about "no material". Go to Material tab and click New material.
5. rename the road segment object+mesh.
6. switch to shading tab. Shader nodes are the only way to edit material in modern Blender. Add a Texture->ImageTexture node, then link it to the texture we created, and link the node to our material.
7. Test out the texture painting agin - this time it works.

21 blender roadmesh texture mapping.png


step22. Paint the road texture. For simplicity, we'll create hand-painted placeholder textures for all objects in this tutorial. It's up to you whether you go further and replace the textures with something more reallistic.

Important: textures created by blender are by default not packed into the .blend file! That means you must either explicitly tell Blender to pack the texture in the .blend, or manually save it as a file. Otherwise it will be lost after you close the project. I forgot with this texture, that's why it will suddenly change in the next steps.

1. Use the default brush for the base paint - blueish asphalt, yellow/beige/green edges. Tip: adjust brush strength in the 3D viewport top bar. Hotkey F activates brush-scale mode.
2. To paint the white strip, set sharp fallow, full strength
3. Finally, the Smudge tool creates very nice effect.
4. Save your texture as file!

22 blender roadmesh texture paint.png


step23. Setup the road spline.
To make the follow the spline, bend but not stretch, we must combine 2 object modifiers: Array (duplicates the object along an axis) and Curve (bends object along a spline).

1. add the Array modifier
2. set it to type=curve
3. add the spline from top menu
4. name the spline
5. bind the spline to the Array modifier of the road segment.
6. at this point I noticed the road segment is oriented wrong - it should follow the X axis rather than Y axis. I switched to top view (hotkey numpad 7), activated Editmode and used Rotatemode (hotkey R) while holding Ctrl.
7. add the Curve modifier
8. bind the spline to the Curve modifier
9. activate Editmode on the spline, move it's points around or extrude the end points - the mesh will follow along.

23 blender roadmesh path setup.png


step24. First road! Just move the verts of the spline using Grab mode and add more using Extrude.

Scale fix: At this point I realized my sense of scale failed me. I used a footbal pitch for scale, but it was a stadium-size one while I had a village-sized one in mind. I should have used a tennis playfield, I'm more familiar with those. Anyway, I went to edit mode on the terrain mesh and scaled it down to 250x250 meters. This is truly miniature scale but it's perfect for my purpose - I want tiny but densely decorated circuit to practice Blender while keeping the project manageable.

Blender has a perfect utility for placing roads on terrain - Snap mode. When configured right, you can simply work in the top-view mode and Blender will automatically snap the spline points to the surface of the terrain. Since the road mesh has the asphalt surface slightly above the origin point, placing the spline exactly on the ground will result in the road being thick just right. Note that the snap tool tends to try to snap to the road mesh itself - to work it around, disable the roadmesh visibility in the Outliner window on top right.

24 blender first road.png


Next steps: more roads, dirt tracks, bridges. Stay tuned.

@Fili86RaceFace Thanks for offering help but I want to experiment with unsual ways of building the objects, so I'll do everything manually myself.
 
Last edited:
step18. Fix the mesh placement. After some testing I concluded this is an oddity in the game and I must work it around. Correct me if I'm mistaken.
First, make sure you always export with the "Swap axis" set to "xz-y" aka "ogre standard".
Second, add -90 degree rotation to the TOBJ line, see the screenshot.
Tip: use the game's top menubar to reload the terrain on the go.

View attachment 14694

step19. I added an extra plane to visualize water level. The grid wasn't clear enough for the job.
1. add new plane from the top menu, like before
2. move it using grab mode (hotkey G, plus X/Y/Z keys to constrain movement to one axis) and scale it using scale mode (hotkey S, the same X/Y/Z keys apply).
3. add a material to it. Select the Material tab and click Add new.
4. Scroll down on the options until you find "Viewport display" box. Click the color box and use color picker.

View attachment 14696


step20. Create road mesh. We'll model roads by creating a textured road segment and then repeating+bending it along a spline. To create the mesh:
1. add cube from top menu.
2. switch to Edit mode on it, press numpad 7 for top-view, then G for grab mode and position it so that it starts at the X axis (red line, see the gizmo)
3. activate Face select on top menubar, select the bottom, front and rear face, press DELETE for the delete menu and select Faces. This gives us a basic road mesh with surface and edges.
4. now we want to 'flatten' the road mesh. To do it, we must either scale the mesh or select vertices and move them around. Let's do the latter. Activate the x-ray option on top menubar so you can select all vertices, even those behind an object. Press numpad 1 for front view, hotkey B for box-select tool, select the verts you need.
5. Use grab mode to position the vertices near the X axis
6. now we want to widen the base of the road. With the bottom nodes selected, use Scale mode (hotkey S) with constraint on X axis (hotkey X) and scale it as you want.
7. almost done except the segment is too long. This time let's use the scale mode. But we don't want to scale around the center of the segment, but around the origin point. To do it, set pivot in the top menubar. Then the scaling will only work in the direction we need.
8. now the segment is too short to contain the dashed white line. Let's double it's length by extruding. Select only the vertices at the end of the segment, then press E for Extrude. This puts you grab mode - use Ctrl to position it nicely.
View attachment 14697

step21. Add texture to the road segment. In Blender, this means to define texture coordinates (aka UV coordinates in Blender) - this is called Unwrapping. Second we must create a Texture datablock. Finally we must add a material to map the texture onto the mesh.

1. change to UV Editing tab. In the UV Editor window, you'll see there are texcoords already, just quite random.
2. perform unwrap - Blender is very good at auto-aligning the texcoords to make sense.
3. create a texture. Name it something sensible.
4. try out the texture painting. It will work in the UV Editor window, but when you try in the 3D viewport, it'll complain about "no material". Go to Material tab and click New material.
5. rename the road segment object+mesh.
6. switch to shading tab. Shader nodes are the only way to edit material in modern Blender. Add a Texture->ImageTexture node, then link it to the texture we created, and link the node to our material.
7. Test out the texture painting agin - this time it works.

View attachment 14698

step22. Paint the road texture. For simplicity, we'll create hand-painted placeholder textures for all objects in this tutorial. It's up to you whether you go further and replace the textures with something more reallistic.

Important: textures created by blender are by default not packed into the .blend file! That means you must either explicitly tell Blender to pack the texture in the .blend, or manually save it as a file. Otherwise it will be lost after you close the project. I forgot with this texture, that's why it will suddenly change in the next steps.

1. Use the default brush for the base paint - blueish asphalt, yellow/beige/green edges. Tip: adjust brush strength in the 3D viewport top bar. Hotkey F activates brush-scale mode.
2. To paint the white strip, set sharp fallow, full strength
3. Finally, the Smudge tool creates very nice effect.
4. Save your texture as file!

View attachment 14699

step23. Setup the road spline.
To make the follow the spline, bend but not stretch, we must combine 2 object modifiers: Array (duplicates the object along an axis) and Curve (bends object along a spline).

1. add the Array modifier
2. set it to type=curve
3. add the spline from top menu
4. name the spline
5. bind the spline to the Array modifier of the road segment.
6. at this point I noticed the road segment is oriented wrong - it should follow the X axis rather than Y axis. I switched to top view (hotkey numpad 7), activated Editmode and used Rotatemode (hotkey R) while holding Ctrl.
7. add the Curve modifier
8. bind the spline to the Curve modifier
9. activate Editmode on the spline, move it's points around or extrude the end points - the mesh will follow along.

View attachment 14700

step24. First road! Just move the verts of the spline using Grab mode and add more using Extrude.

Scale fix: At this point I realized my sense of scale failed me. I used a footbal pitch for scale, but it was a stadium-size one while I had a village-sized one in mind. I should have used a tennis playfield, I'm more familiar with those. Anyway, I went to edit mode on the terrain mesh and scaled it down to 250x250 meters. This is truly miniature scale but it's perfect for my purpose - I want tiny but densely decorated circuit to practice Blender while keeping the project manageable.

Blender has a perfect utility for placing roads on terrain - Snap mode. When configured right, you can simply work in the top-view mode and Blender will automatically snap the spline points to the surface of the terrain. Since the road mesh has the asphalt surface slightly above the origin point, placing the spline exactly on the ground will result in the road being thick just right. Note that the snap tool tends to try to snap to the road mesh itself - to work it around, disable the roadmesh visibility in the Outliner window on top right.

View attachment 14701

Next steps: more roads, dirt tracks, bridges. Stay tuned.

@Fili86RaceFace Thanks for offering help but I want to experiment with unsual ways of building the objects, so I'll do everything manually myself.
I just want to say this is a big help to all of us, I truly mean it, and honestly I think this is the biggest help in modding/development yet and it will help a lot of people!!!! : D
 
step25. Create another road by Duplicating the existing one. This will also duplicate the mesh and the modifiers.
  1. Go to Object mode, deselect all objects (hotkey: Alt+A). Select the "quick_and_lazy_road" object. Press Shift + D to duplicate it. This will activate Grab mode on the new object (see Scr 1). Press Escape to abort the Grab mode. This will put the object exactly where the original is, so it will "disappear".
  2. Expand both the original and copied object in the Outliner window.
  3. Rename the copied object
  4. Rename the copied mesh
25 ShiftD copy road.png


step 26. Create new path.
This is a recap from step 23.
  1. Switch to Object mode and add new Path from top menu bar, menu Add, submenu Curve.
  2. Rename path object, see screenshot 3 above.
  3. Rename mesh object, see screenshot 4 above.
26 Add and rename new path.png


step27. Model the new path
  1. Use Grab and Extrude in top-view mode (Hotkey numpad 7)
  2. See how the verts handily snap to the ground mesh thanks to the Snapping setup from step24.
  3. It helps to angle the camera so that you can recognize the slopes.
27 Grab and extrude new path.png


step 28. Rebind modifiers to new curve, fix tilt.
  1. Select the town road mesh object (either in 3D view or in Outliner, it works the same). Open the Modifiers tab (blue wrench icon), click the Curve: boxes and select the new curve.
  2. If the road comes tilted, Select the road path object, enter Edit mode, select Tilt tool in left vertical bar, and click in the yellow circle to adjust tilt.
28 road modifiers and tilt.png


Homework tips (what's coming next):
  • Edit the town road mesh to add pavement(s). see step21.
  • Create new material for the town road and add a new texture. See step21.
  • Use Texture paint mode to create pavement texture. See step 22.
  • Redo steps 25-28 and edit mesh/create material to create a bridge mesh with a pillar segment.
  • Disable the Snap mode and place bridges over the river.
Have fun!

PS:
@Jett G Thanks! I'm happy it's being noticed. Blender can be intimidating so I'm really taking it slow.
 
Last edited:
step25. Create another road by Duplicating the existing one. This will also duplicate the mesh and the modifiers.
  1. Go to Object mode, deselect all objects (hotkey: Alt+A). Select the "quick_and_lazy_road" object. Press Shift + D to duplicate it. This will activate Grab mode on the new object (see Scr 1). Press Escape to abort the Grab mode. This will put the object exactly where the original is, so it will "disappear".
  2. Expand both the original and copied object in the Outliner window.
  3. Rename the copied object
  4. Rename the copied mesh
View attachment 14709

step 26. Create new path.
This is a recap from step 23.
  1. Switch to Object mode and add new Path from top menu bar, menu Add, submenu Curve.
  2. Rename path object, see screenshot 3 above.
  3. Rename mesh object, see screenshot 4 above.
View attachment 14712

step27. Model the new path
  1. Use Grab and Extrude in top-view mode (Hotkey numpad 7)
  2. See how the verts handily snap to the ground mesh thanks to the Snapping setup from step24.
  3. It helps to angle the camera so that you can recognize the slopes.
View attachment 14714

step 28. Rebind modifiers to new curve, fix tilt.
  1. Select the town road mesh object (either in 3D view or in Outliner, it works the same). Open the Modifiers tab (blue wrench icon), click the Curve: boxes and select the new curve.
  2. If the road comes tilted, Select the road path object, enter Edit mode, select Tilt tool in left vertical bar, and click in the yellow circle to adjust tilt.
View attachment 14715

Homework tips (what's coming next):
  • Edit the town road mesh to add pavement(s). see step21.
  • Create new material for the town road and add a new texture. See step21.
  • Use Texture paint mode to create pavement texture. See step 22.
  • Redo steps 25-28 and edit mesh/create material to create a bridge mesh with a pillar segment.
  • Disable the Snap mode and place bridges over the river.
Have fun!

PS:
@Jett G Thanks! I'm happy it's being noticed. Blender can be intimidating so I'm really taking it slow.
 

Attachments

  • screenshot_2022-12-11_01-09-52_1.png
    screenshot_2022-12-11_01-09-52_1.png
    83.5 KB · Views: 166
  • screenshot_2022-12-11_01-10-01_1.png
    screenshot_2022-12-11_01-10-01_1.png
    72.3 KB · Views: 165
  • screenshot_2022-12-11_01-10-18_1.png
    screenshot_2022-12-11_01-10-18_1.png
    335.7 KB · Views: 162
  • screenshot_2022-12-11_01-10-31_1.png
    screenshot_2022-12-11_01-10-31_1.png
    166.4 KB · Views: 162
Back
Top