You are using an out of date browser. It may not display this or other websites correctly.
You should upgrade or use an alternative browser.
You should upgrade or use an alternative browser.
Beginner tutorial: Character (rorbot) mod from scratch, in Blender
- Thread starter ohlidalp
- Start date
- Status
- Not open for further replies.
Step 21 - Set transform pivot
We want to scale the bone down, but not towards it's center as Scale mode would do by default, but instead we want the root of the bone to stay where it is and scalle the rest towards it. To do that, set Transform pivot in the top menu bar to "Individual origins".
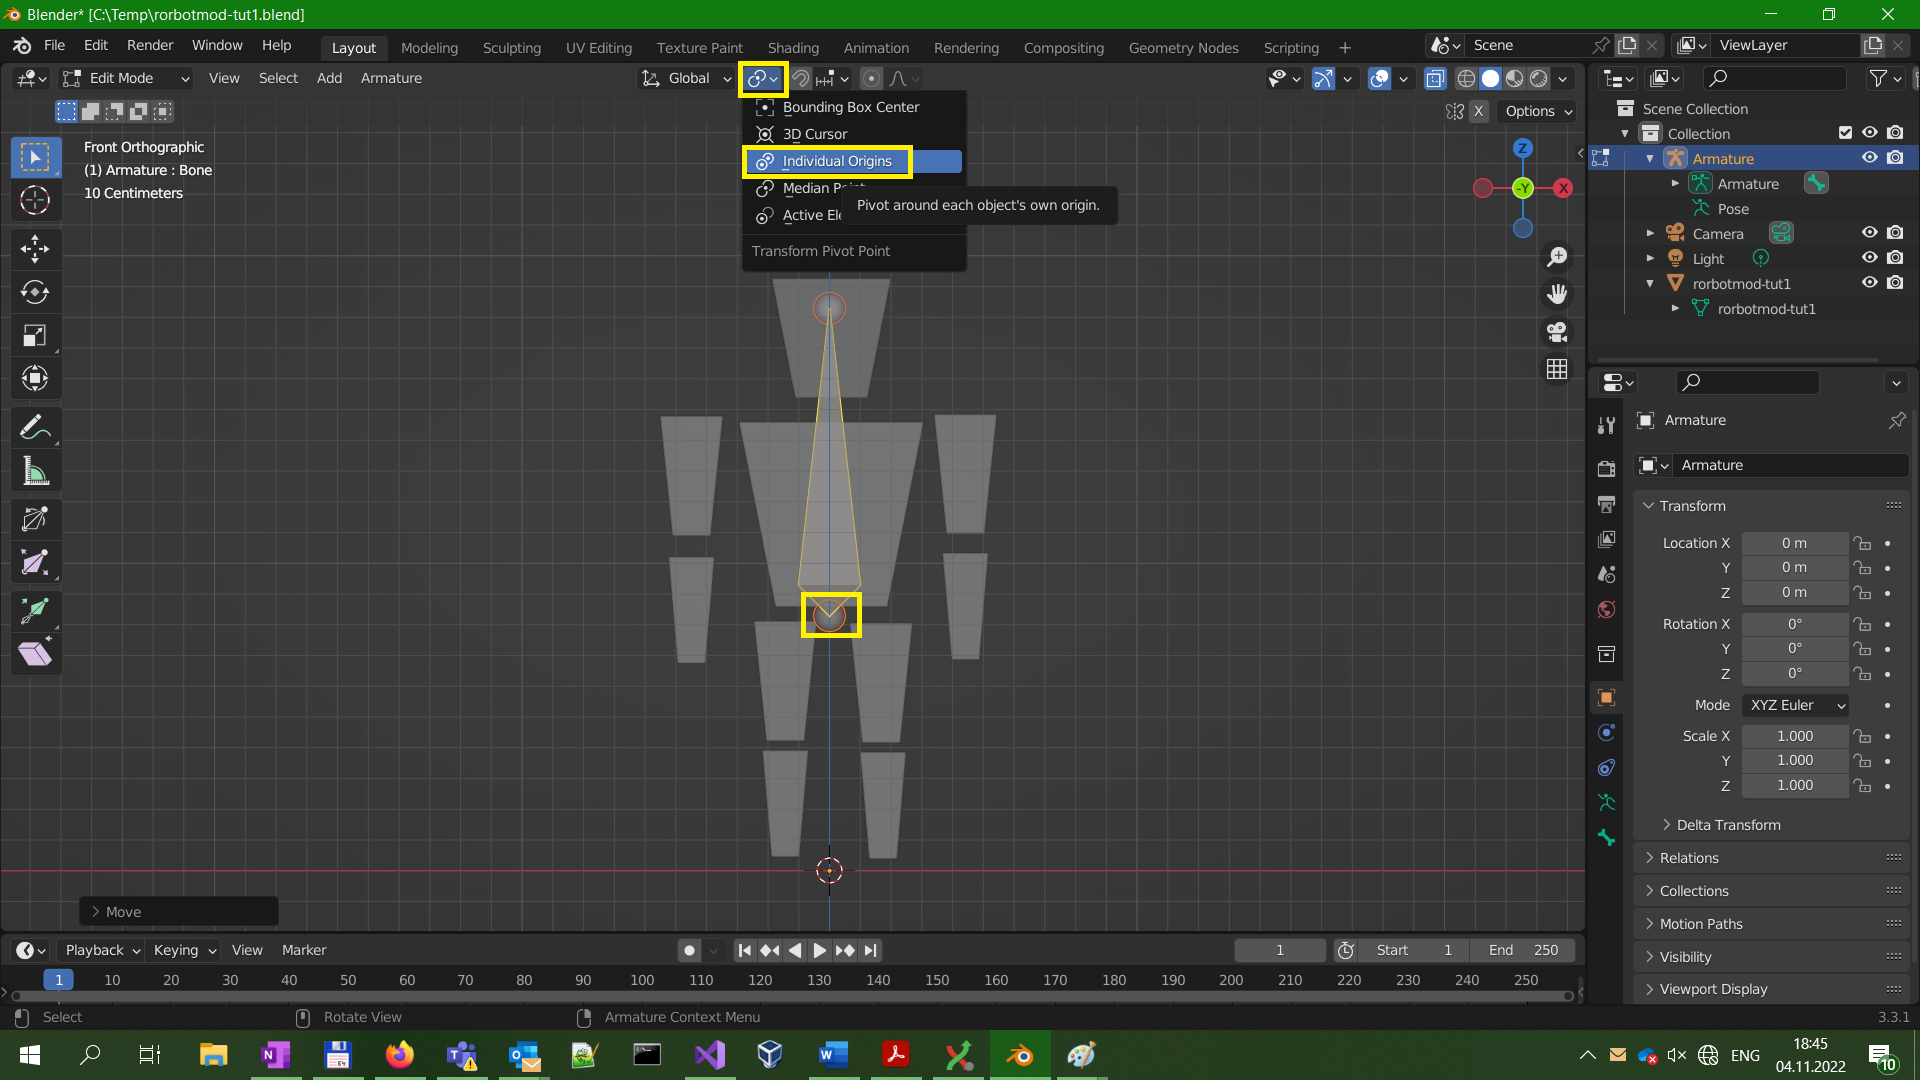
We want to scale the bone down, but not towards it's center as Scale mode would do by default, but instead we want the root of the bone to stay where it is and scalle the rest towards it. To do that, set Transform pivot in the top menu bar to "Individual origins".
Step 27 - Place and name the hand bone
Use grab mode and scale mode like before. The scaling pivot is still set to "Individual origins", so the bone will scale along it's base. Also rename the bone - Use .R at the end because it's a Blender convention which also provides some benefits.
Blender manual: https://docs.blender.org/manual/en/latest/animation/armatures/bones/editing/naming.html
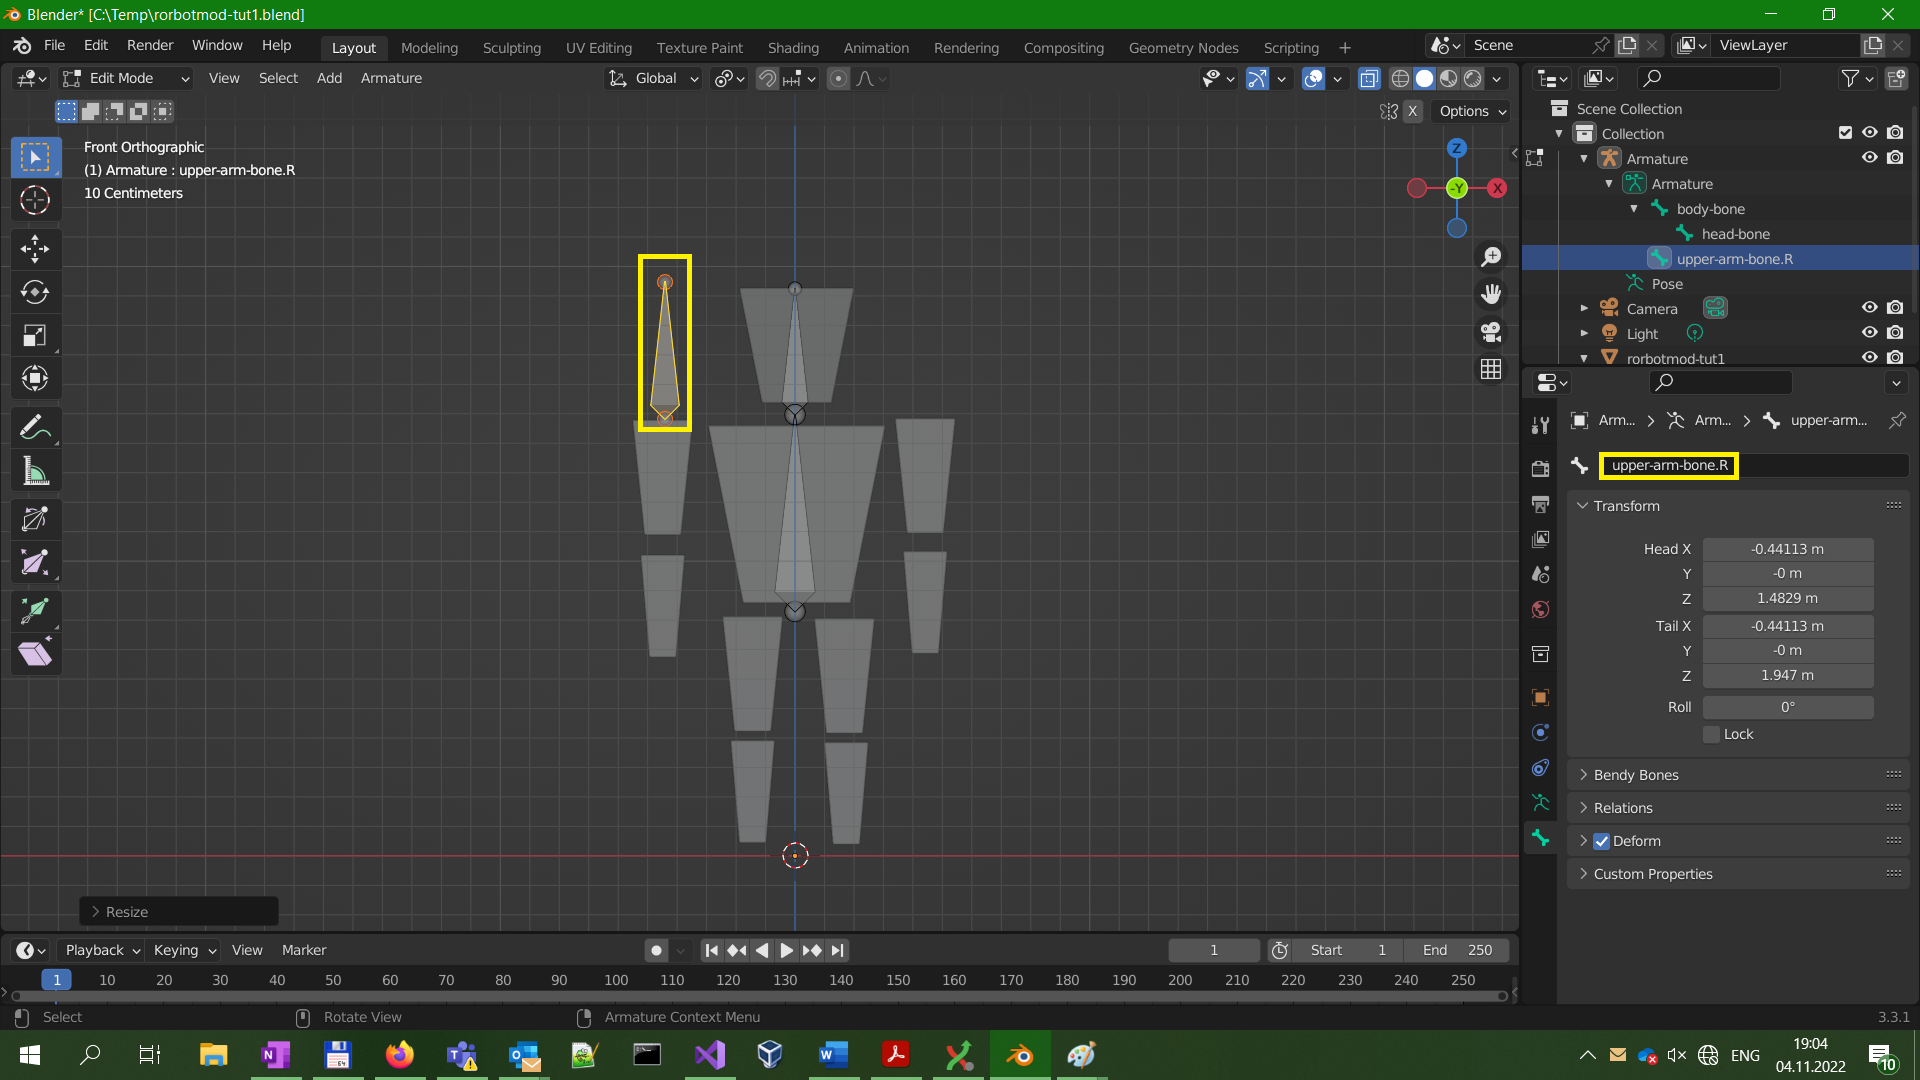
Step 29 - Add bones for hands and legs
Use the Extrude function to create bone for the lower hand. Select the 2 right hand bones and press 'Shift + D' to duplicate them, then place them at the left hand. Repeat to do the legs. Be sure to name all bones well.
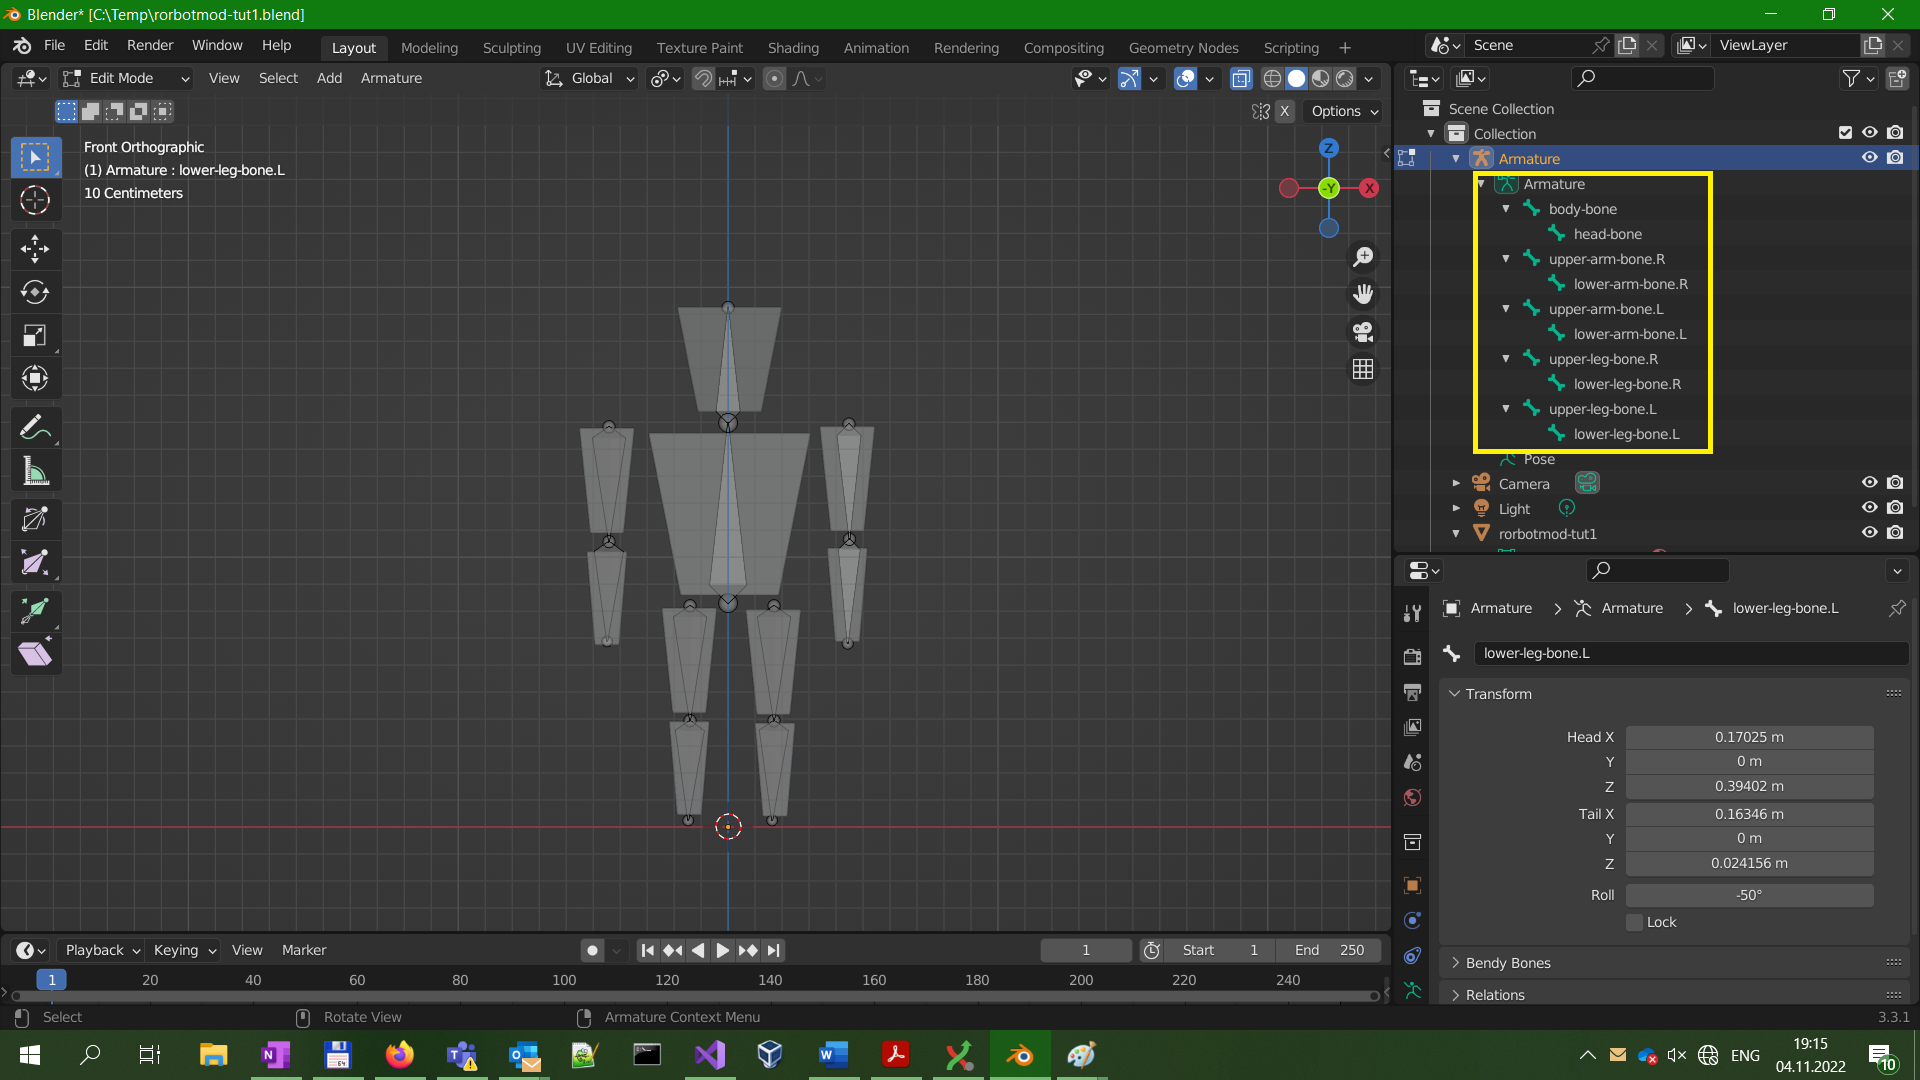
Use the Extrude function to create bone for the lower hand. Select the 2 right hand bones and press 'Shift + D' to duplicate them, then place them at the left hand. Repeat to do the legs. Be sure to name all bones well.
Step 30 - Link the hand bones to the body bone
This process involves a pop-up window so there's more than 1 screenshots in this step.
We want the hand bones to stay where they are but move along with the body. In Blender, this is done by Parenting.
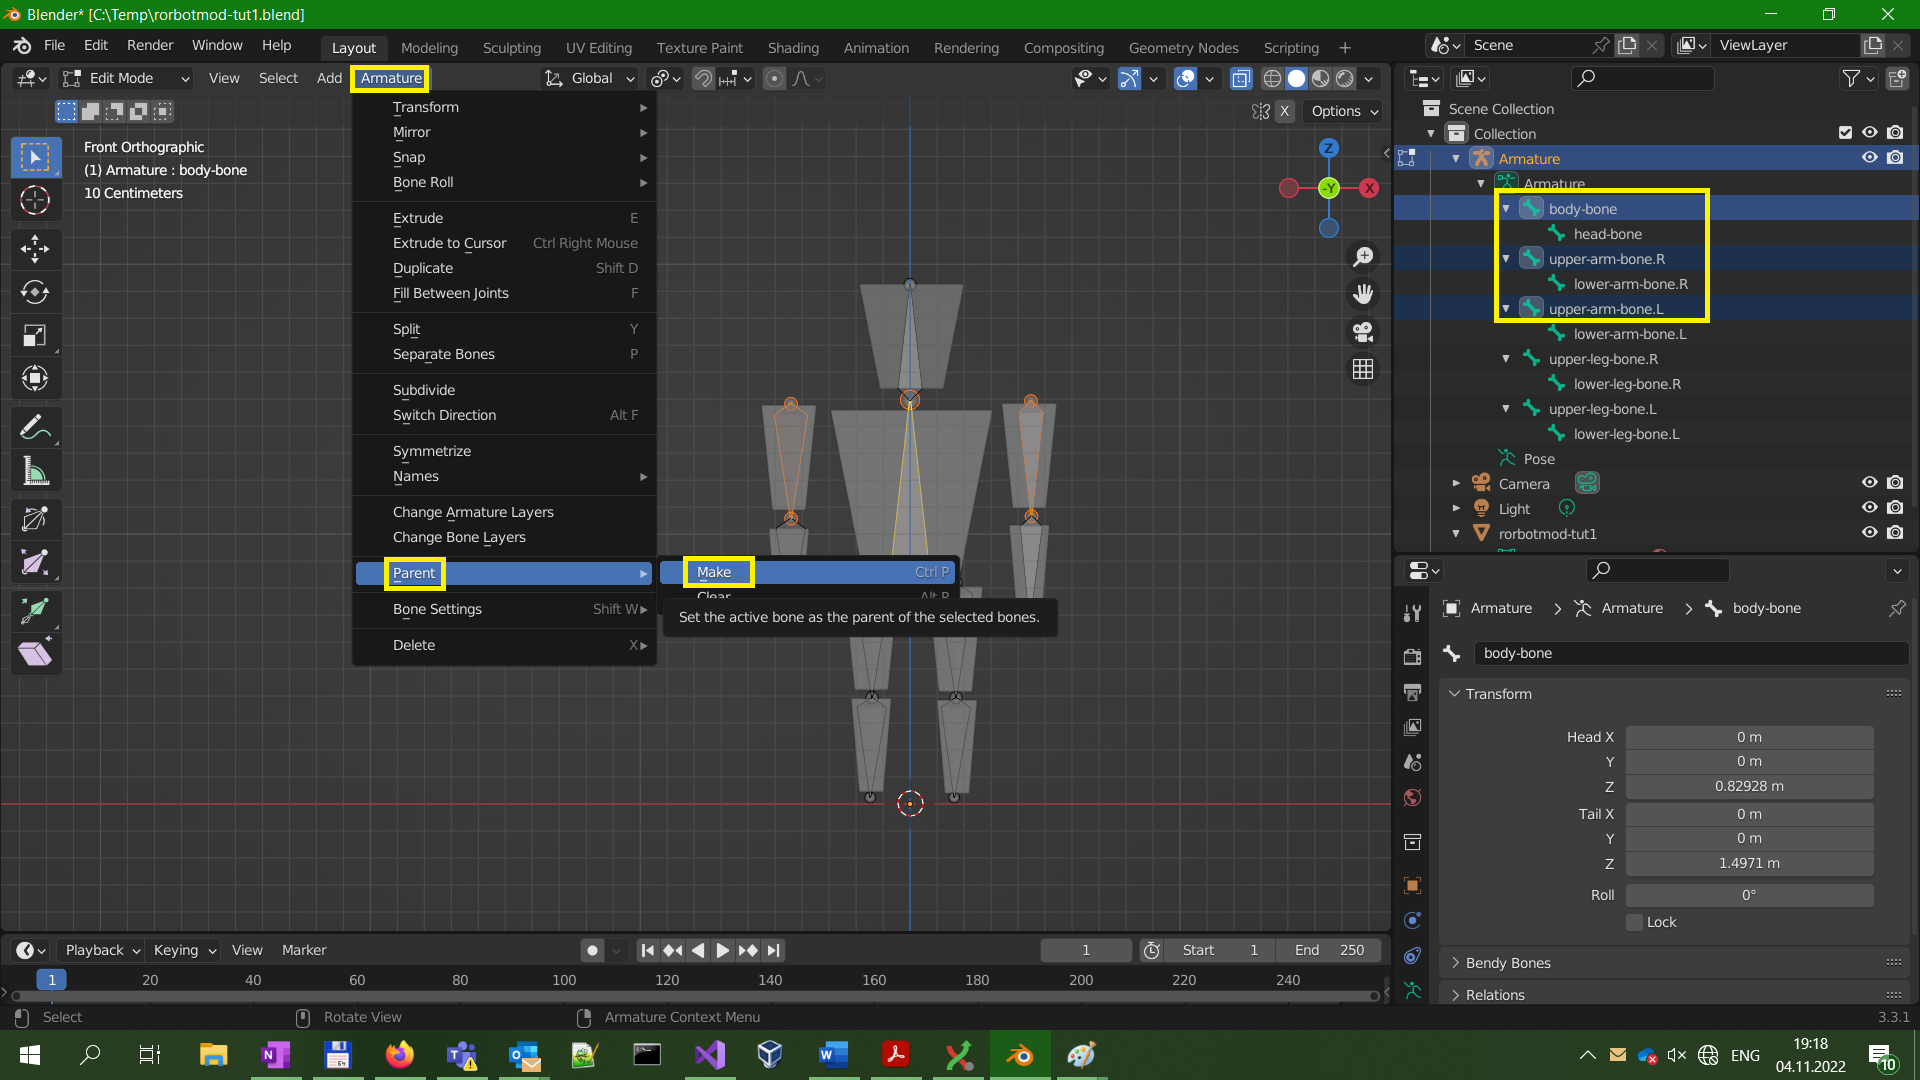
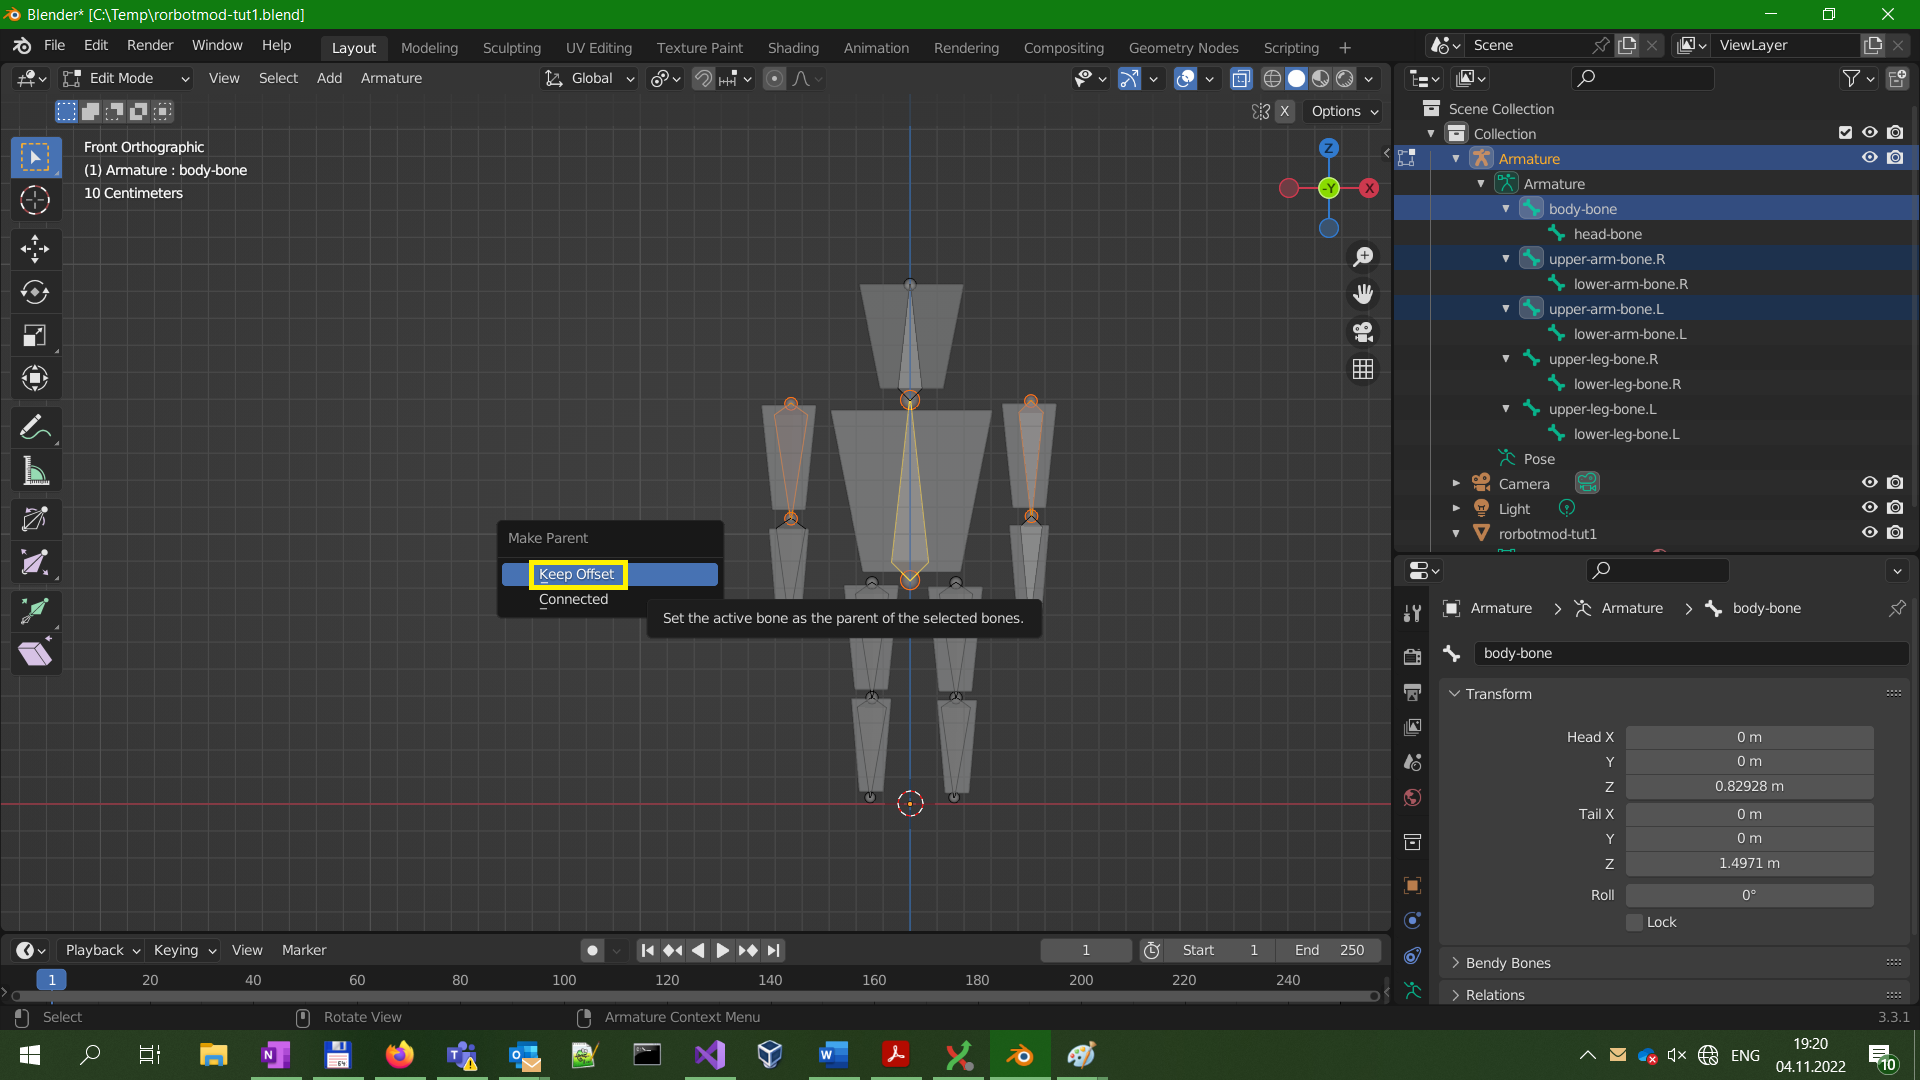
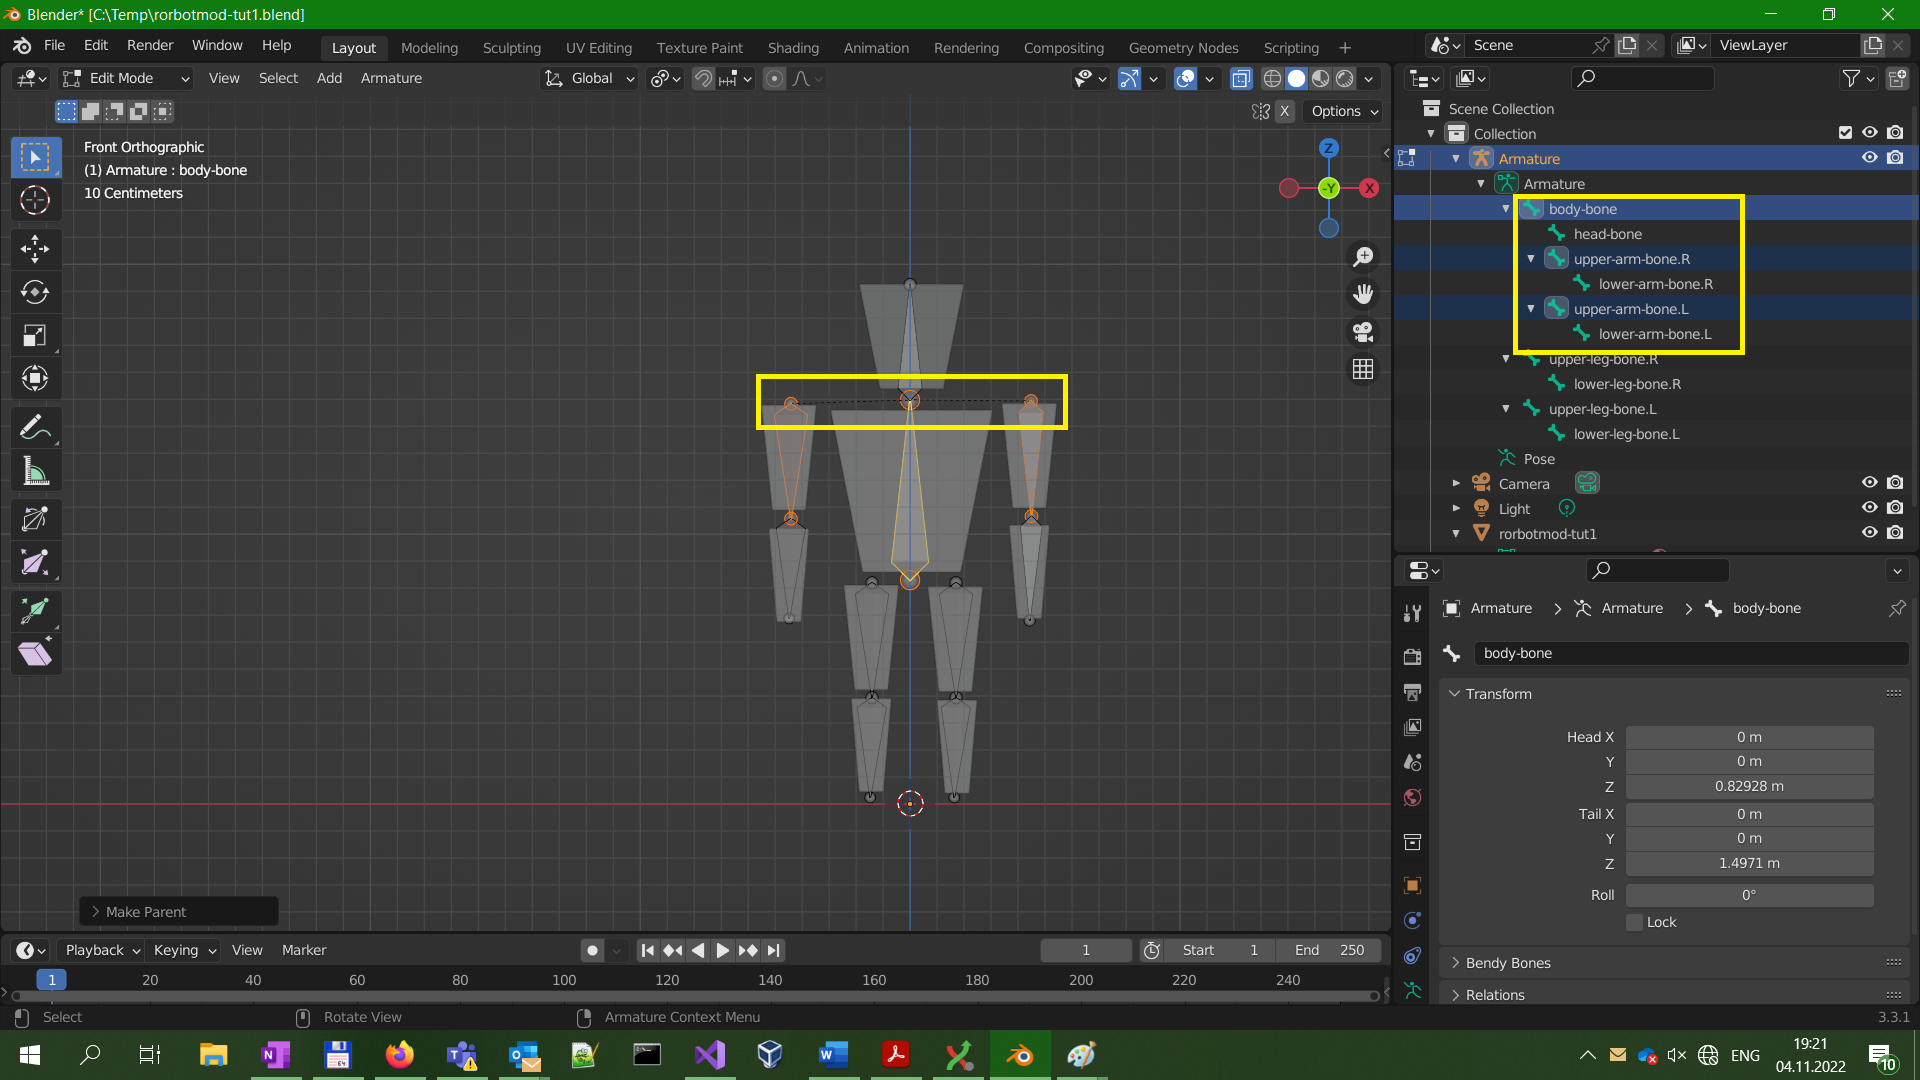
This process involves a pop-up window so there's more than 1 screenshots in this step.
We want the hand bones to stay where they are but move along with the body. In Blender, this is done by Parenting.
- Deselect everything using 'Alt + A'. Then select the upper hand bones first, and the body bone last. Then go to top menu and select Parent/Make.
- In the popup menu, select "Keep offset".
- Notice how there is now a dashed line from the hand bones to the body bone, and the Outliner window (top right) displays the bones as children of the body bone.
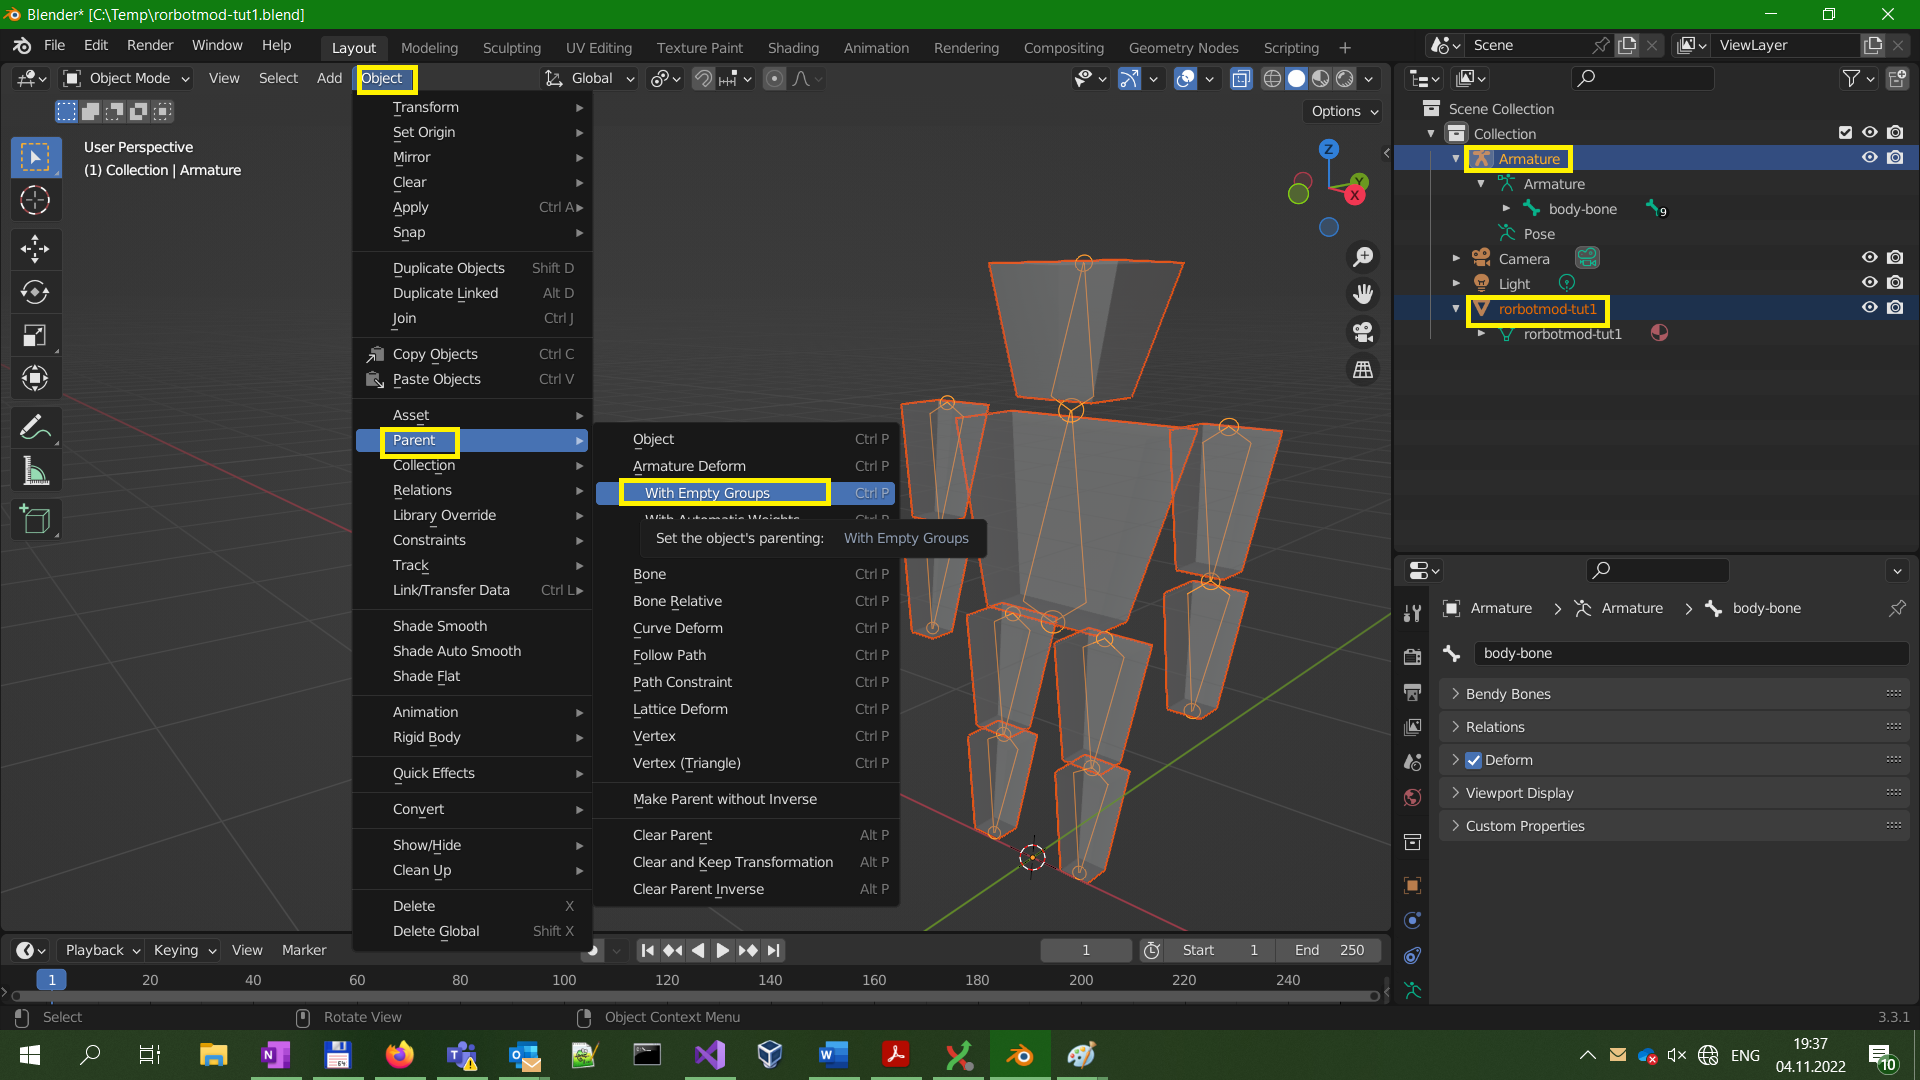
Step 32 - Link the armature (skeleton) to the mesh (3d model)
This is a major milestone - until now, the mesh was just a still figure, but now it becomes a rigged puppet. There is more than one way to do this, ranging from fully automated to fully manual, and I'm going to take the manual route because it nicely illustrates how the system works.
Go to object mode, deselect everything, select the mesh first and the armature second, then select "Object->Parent->With empty groups" from the top menu.
Step 33 - Take a look at vertex groups
The principle of skeletal animation is that each bone moves a part of the mesh along with it. This means there must be some link between the bone and the vertices it's supposed to move. In Blender, this linking is done using Vertex Groups - for each bone, there's a vertex group with the same name. The influence of the bone is controlled by adding and removing verts to/from that group. Let's just take a look a the groups without modifying anything. Notice how selecting a vertex group in the Properties panel also highlights it in the Outliner panel.
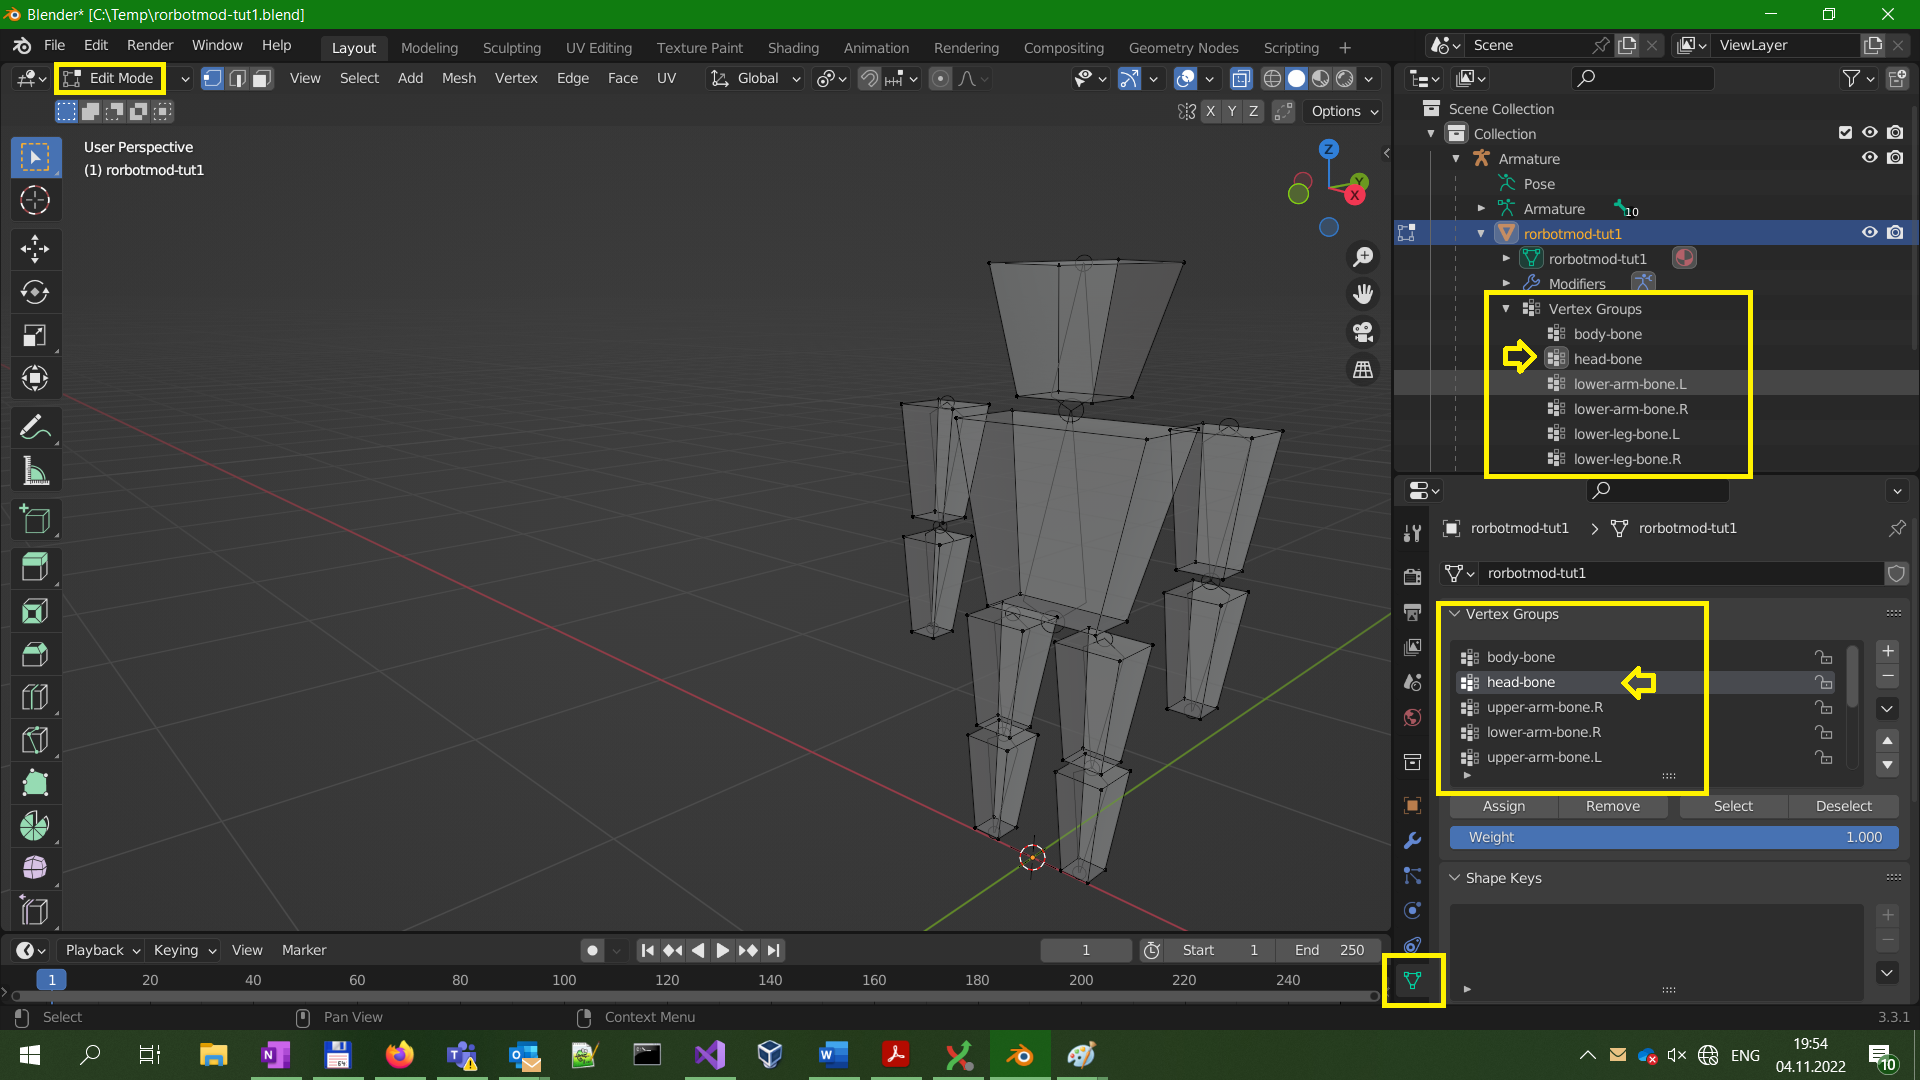
The principle of skeletal animation is that each bone moves a part of the mesh along with it. This means there must be some link between the bone and the vertices it's supposed to move. In Blender, this linking is done using Vertex Groups - for each bone, there's a vertex group with the same name. The influence of the bone is controlled by adding and removing verts to/from that group. Let's just take a look a the groups without modifying anything. Notice how selecting a vertex group in the Properties panel also highlights it in the Outliner panel.
Step 34 - Assign verts to the vertex groups
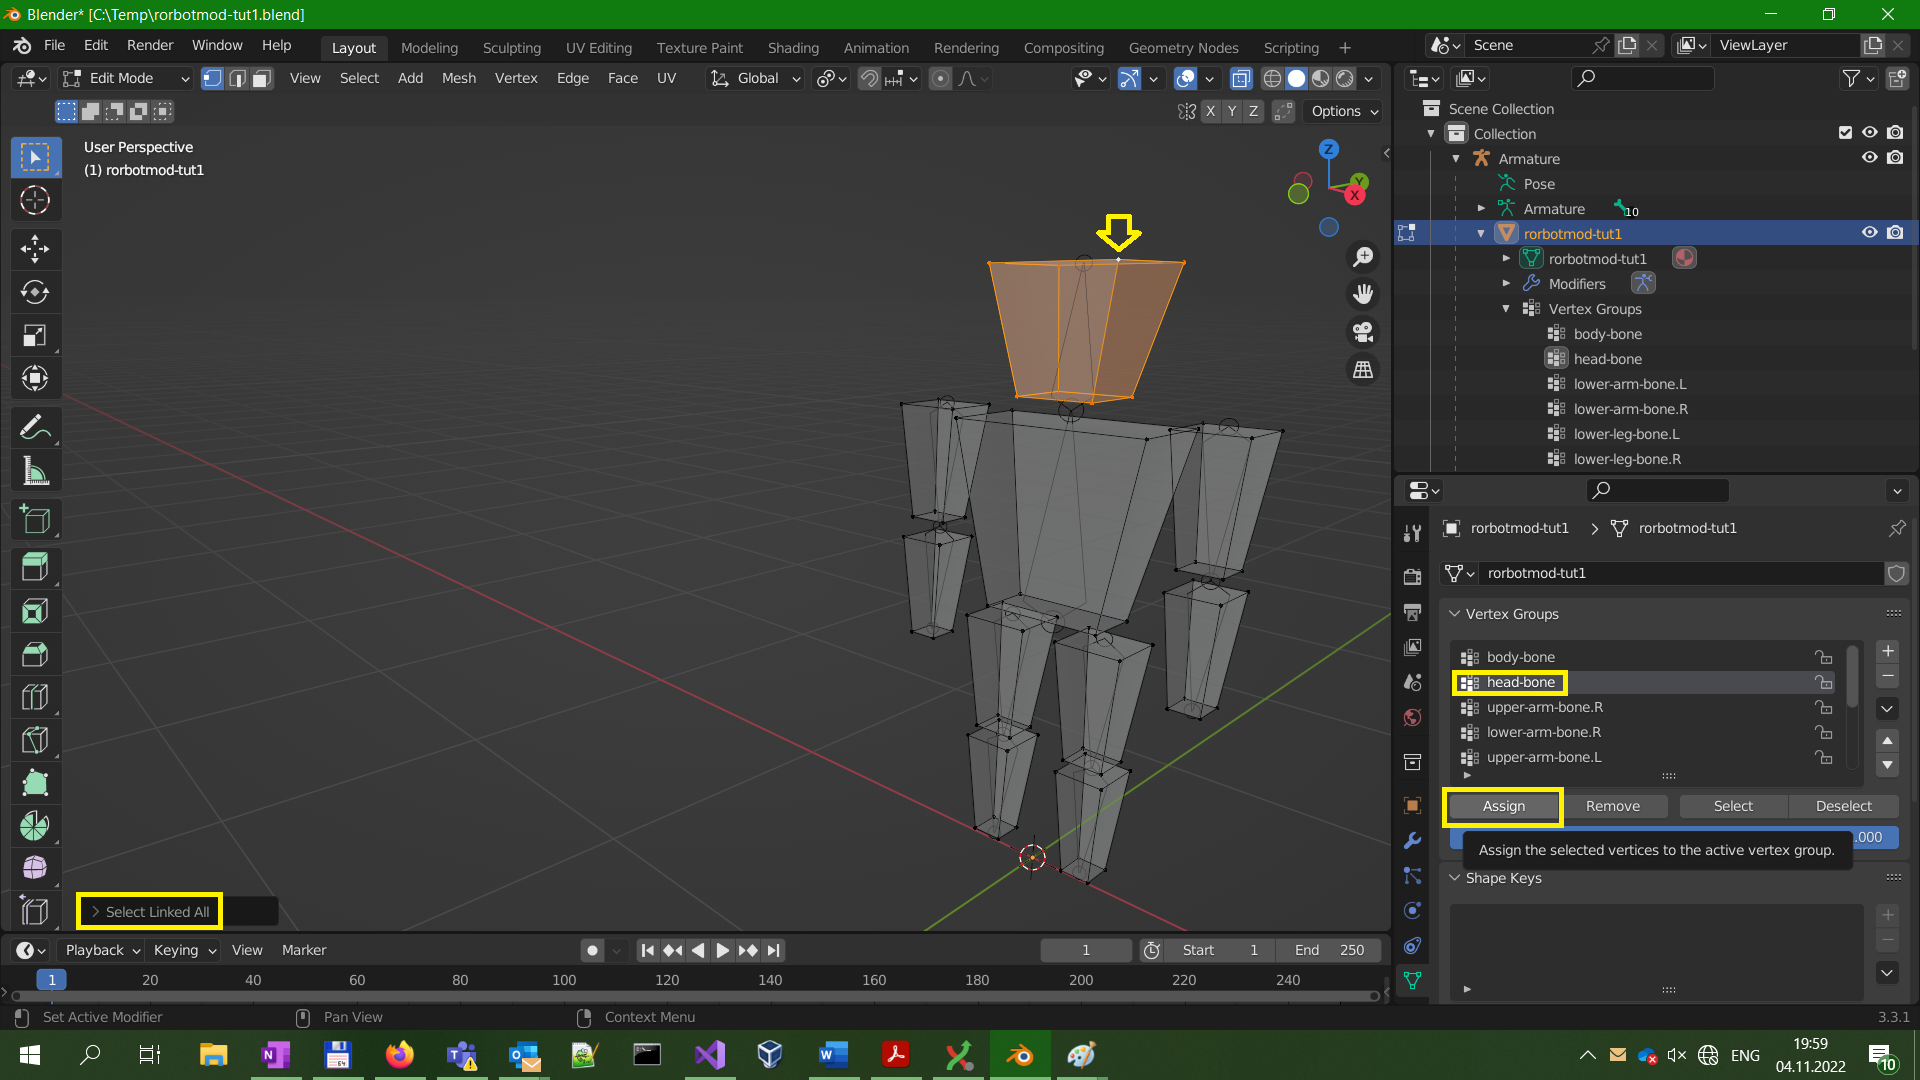
Blender has a "select linked" feature: select one vertex with mouse, then press 'Ctrl + L' to select all other vertices which are reachable via edges. Let's use this to select the head vertices. Then, select the "head bone" vertex group and press Assign button. Repeat this procedure for all bones.
Tip: to see which verts are in a vertex group, deselect everything, select the vertex group and press Select button.
Step 36 - Try posing the character
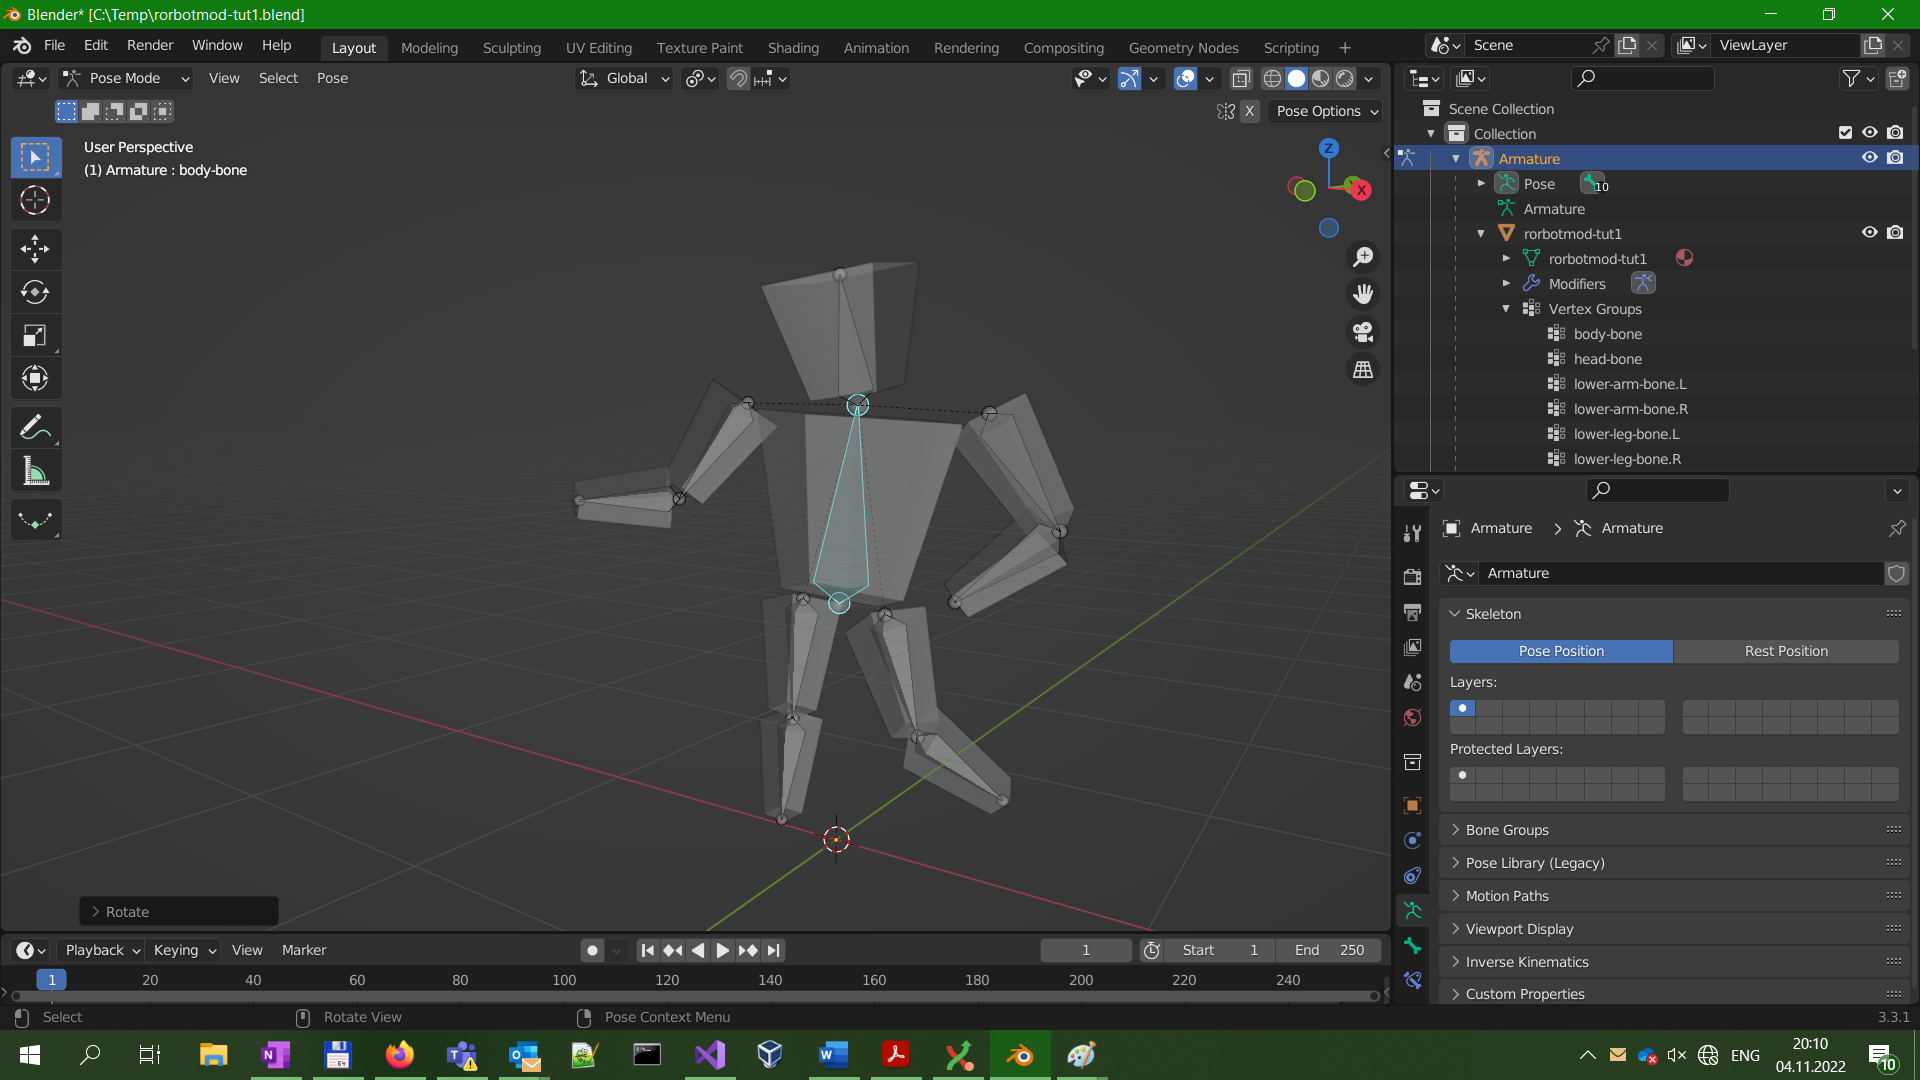
This is just a test to see if the character animates right. Make sure you undo everything using Ctrl+Z afterwards.
Use Grab/Rotate/Scale tools on the bones to pose the character. Note that moving the body bone moves everything else (since we parented all body parts to it), grabbing a headbone just rotates it (since it's attached bo body bone) and grabbing upper arms actually moves them (and they still move with the body).
Step 37 - Your first animation frame
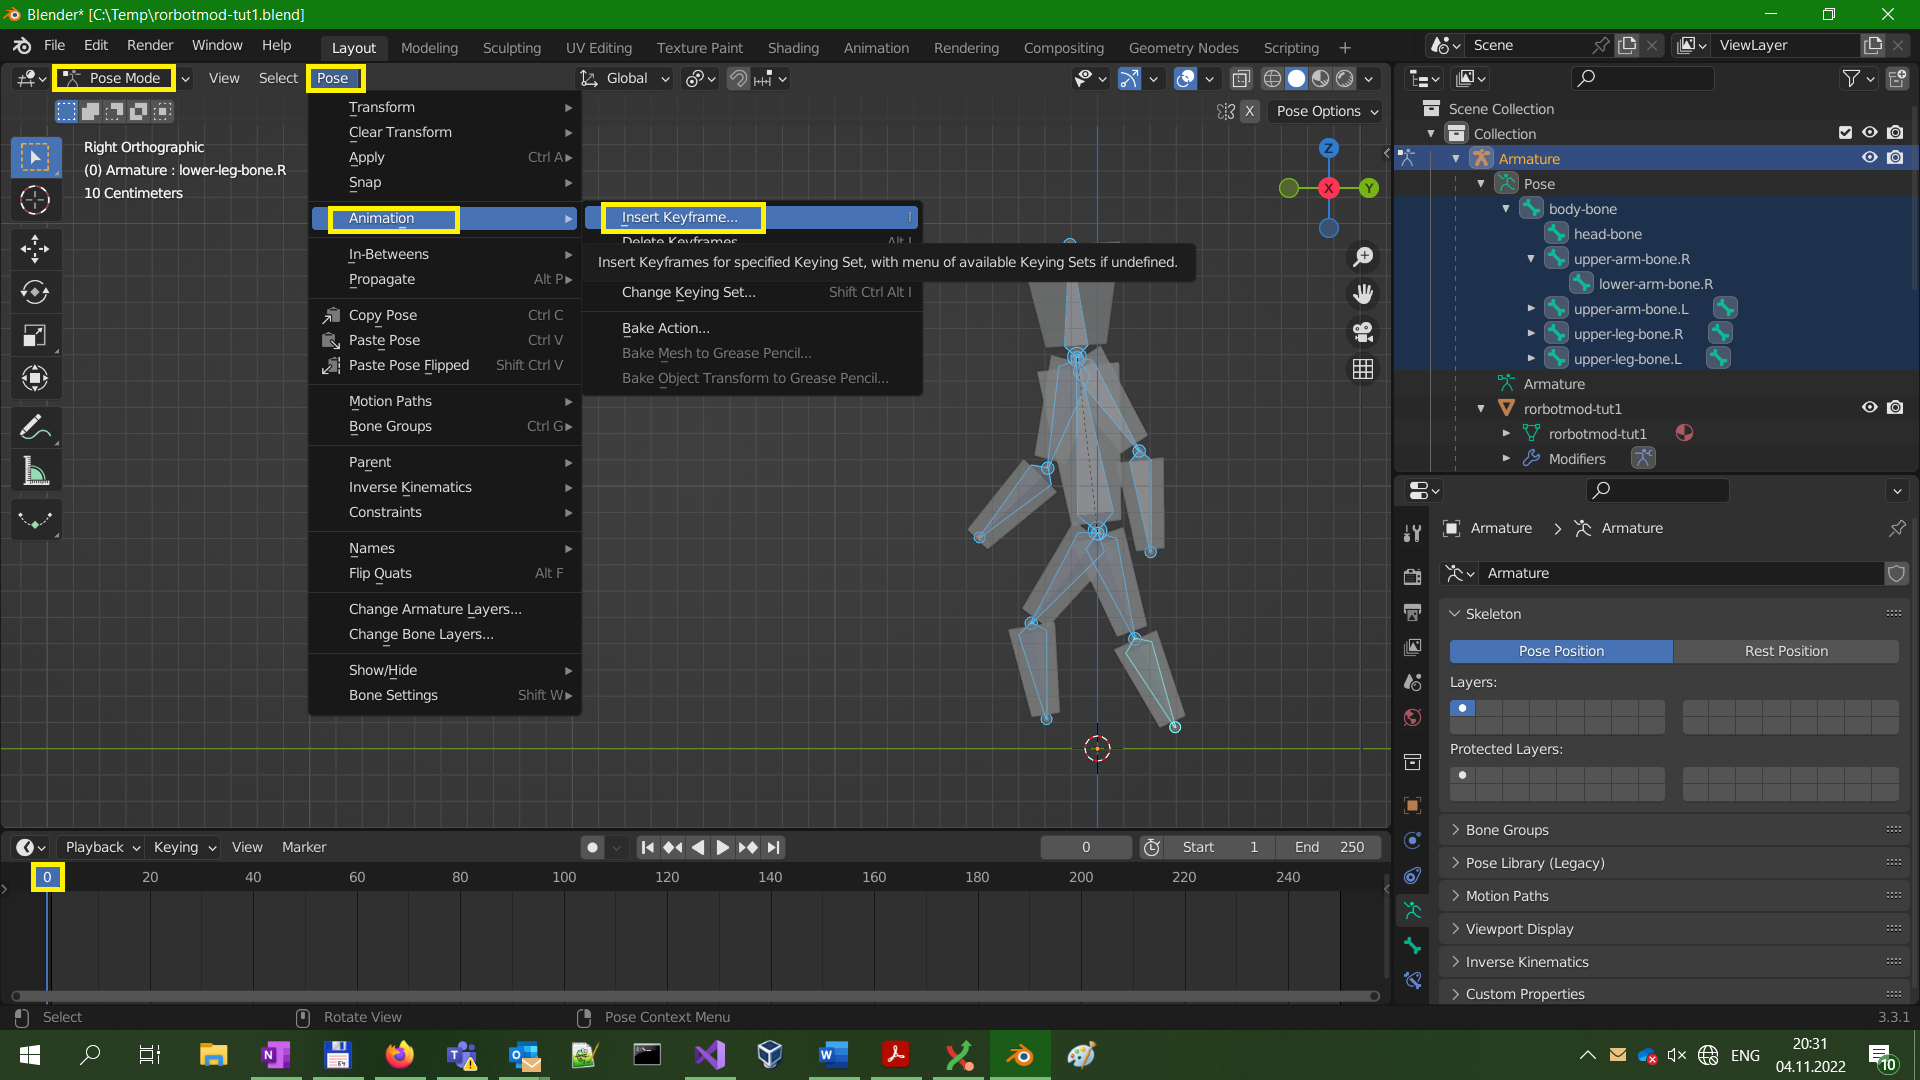
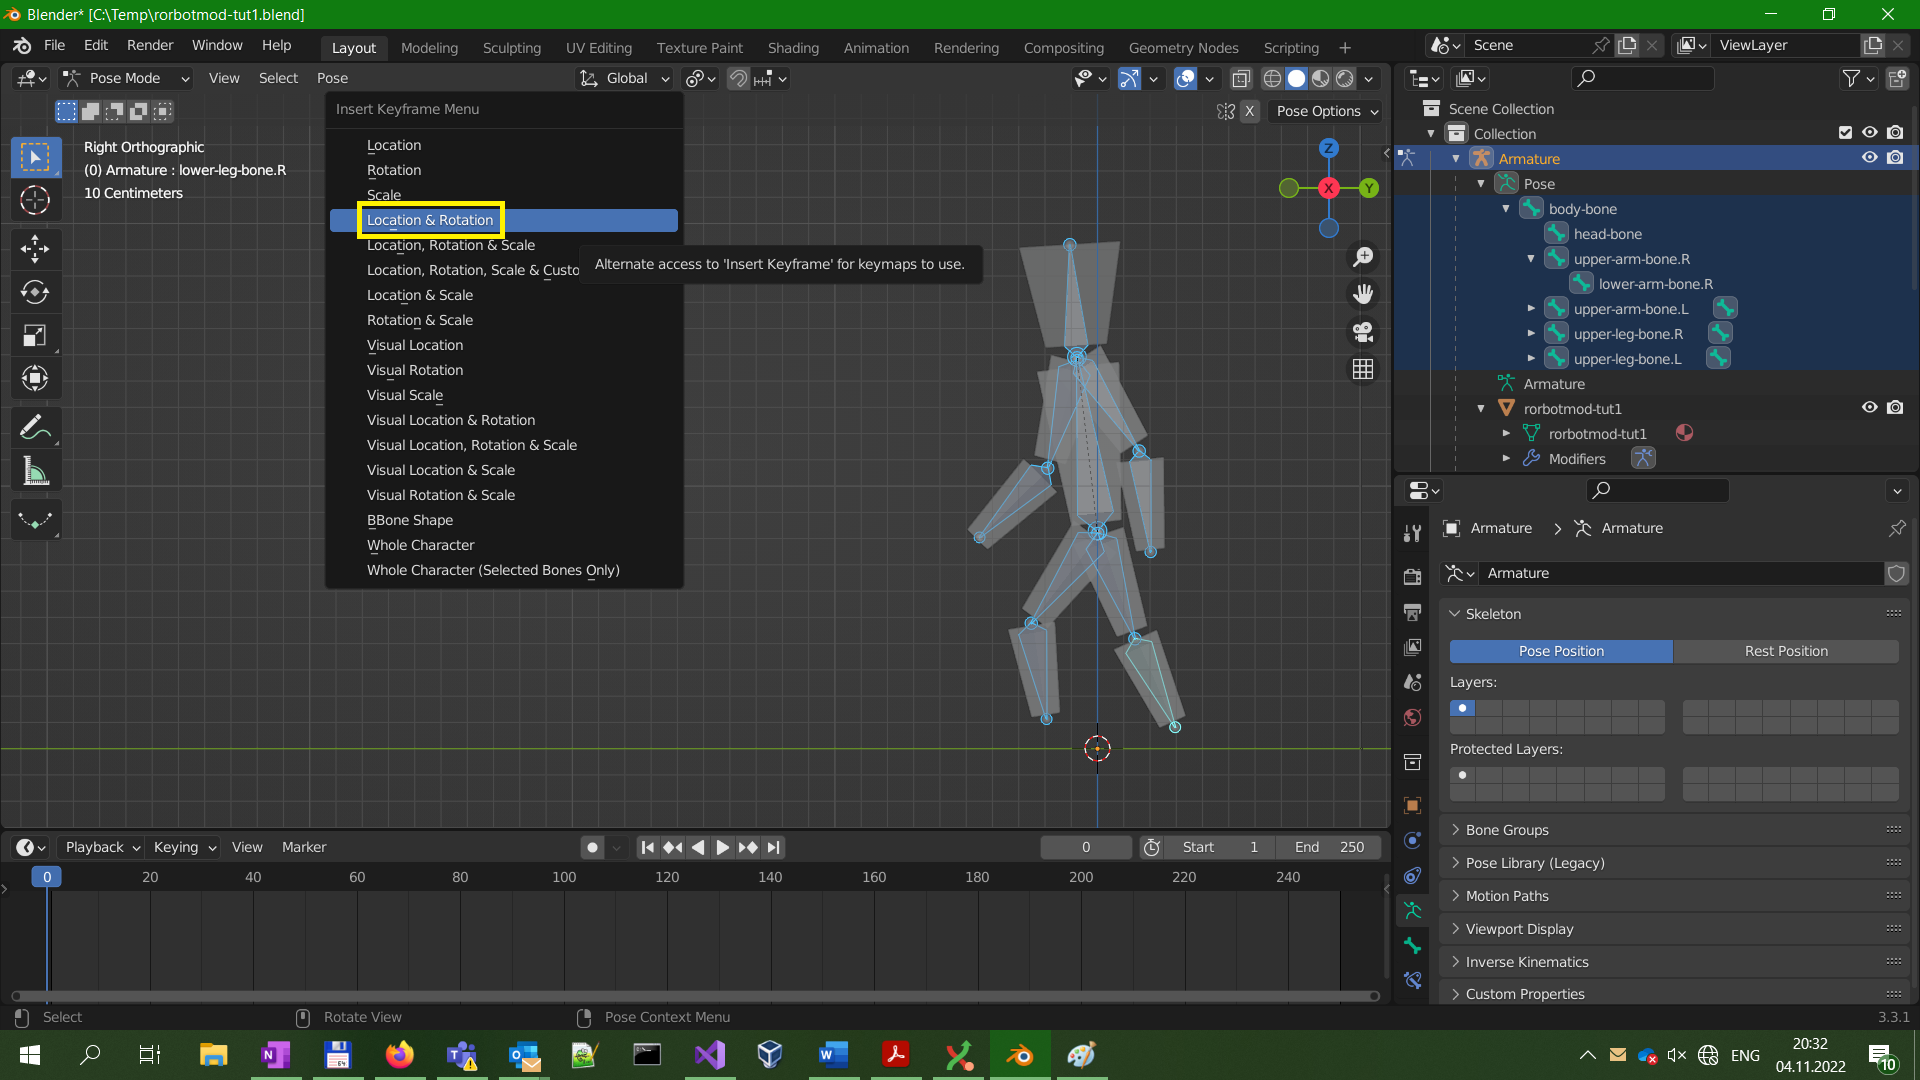
There are 2 screenshots here because of a popup menu.
Rotate camera to side view and pose the character as if walking. Notice I tilted the body forward a bit and the head back a bit. When happy with the pose, insert an animation keyframe using the top menu. Alternatively, you can press 'I' (for Insert) hotkey. In the popup menu, select Location & Rotation.
Step 38 - Second walk animation frame
Walking has 2 major "moments": one where right arm and left leg are at the front, and second where it's opposite. We captured the first moment in the first keyframe, now we need to capture the other moment. Move the slider in the Timeline window to frame 20, and rearrange the character to the new pose. Notice I tilted the whole body forward even more and also tilted the head forward a bit. Then, capture the keyframe like before. Blender will automatically fill in motion between the keyframes, this is called "tweening" in general animation.
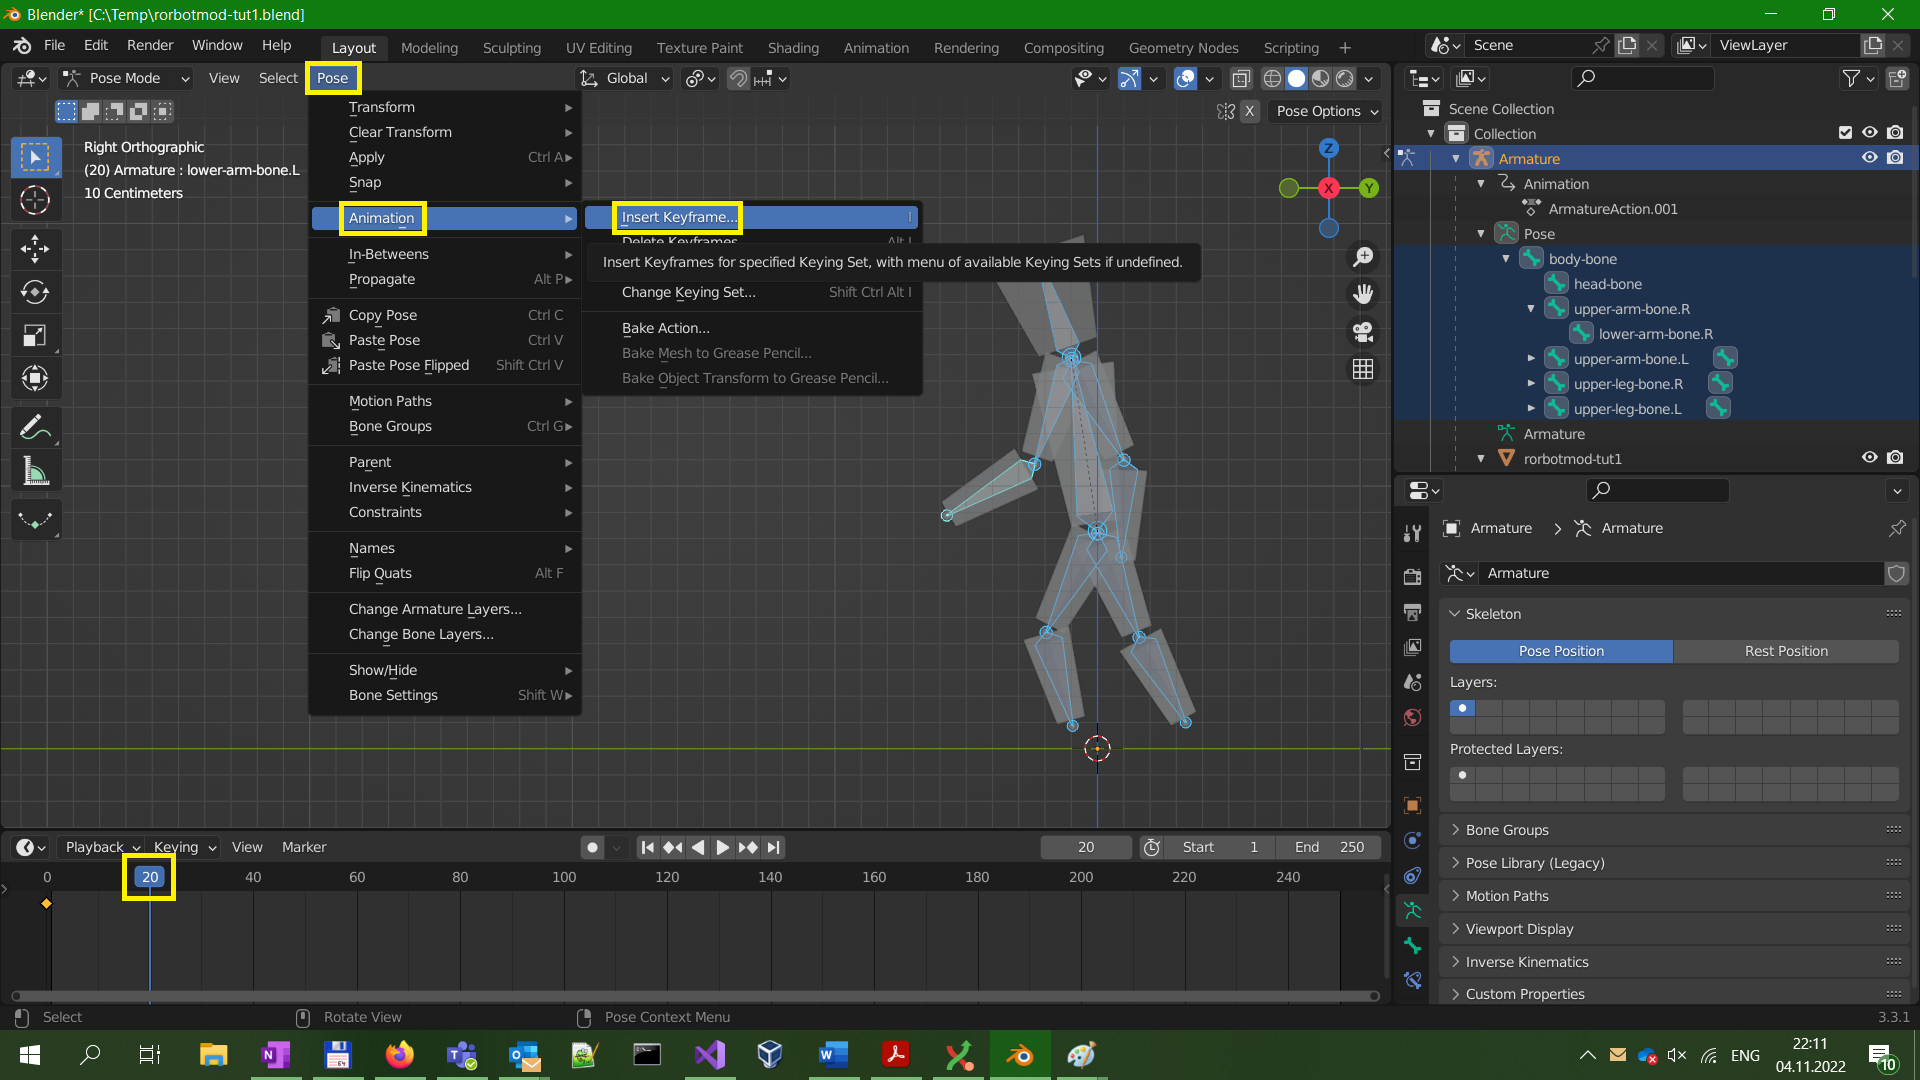
Walking has 2 major "moments": one where right arm and left leg are at the front, and second where it's opposite. We captured the first moment in the first keyframe, now we need to capture the other moment. Move the slider in the Timeline window to frame 20, and rearrange the character to the new pose. Notice I tilted the whole body forward even more and also tilted the head forward a bit. Then, capture the keyframe like before. Blender will automatically fill in motion between the keyframes, this is called "tweening" in general animation.
Last edited:
Step 39 - Capture a frame at position 1
Now, we want to close the loop by returning from the current pose back to original pose. However, we can't just copy and paste the first keyframe because that would add a slight pause to the movement. We need to make the the final keyframe to be just before the initial pose. To do that, let's capture frame at position 1 and copy it to position 39. Move the slider in the Timeline window to position 1, right click the window and select "Insert keyframes".
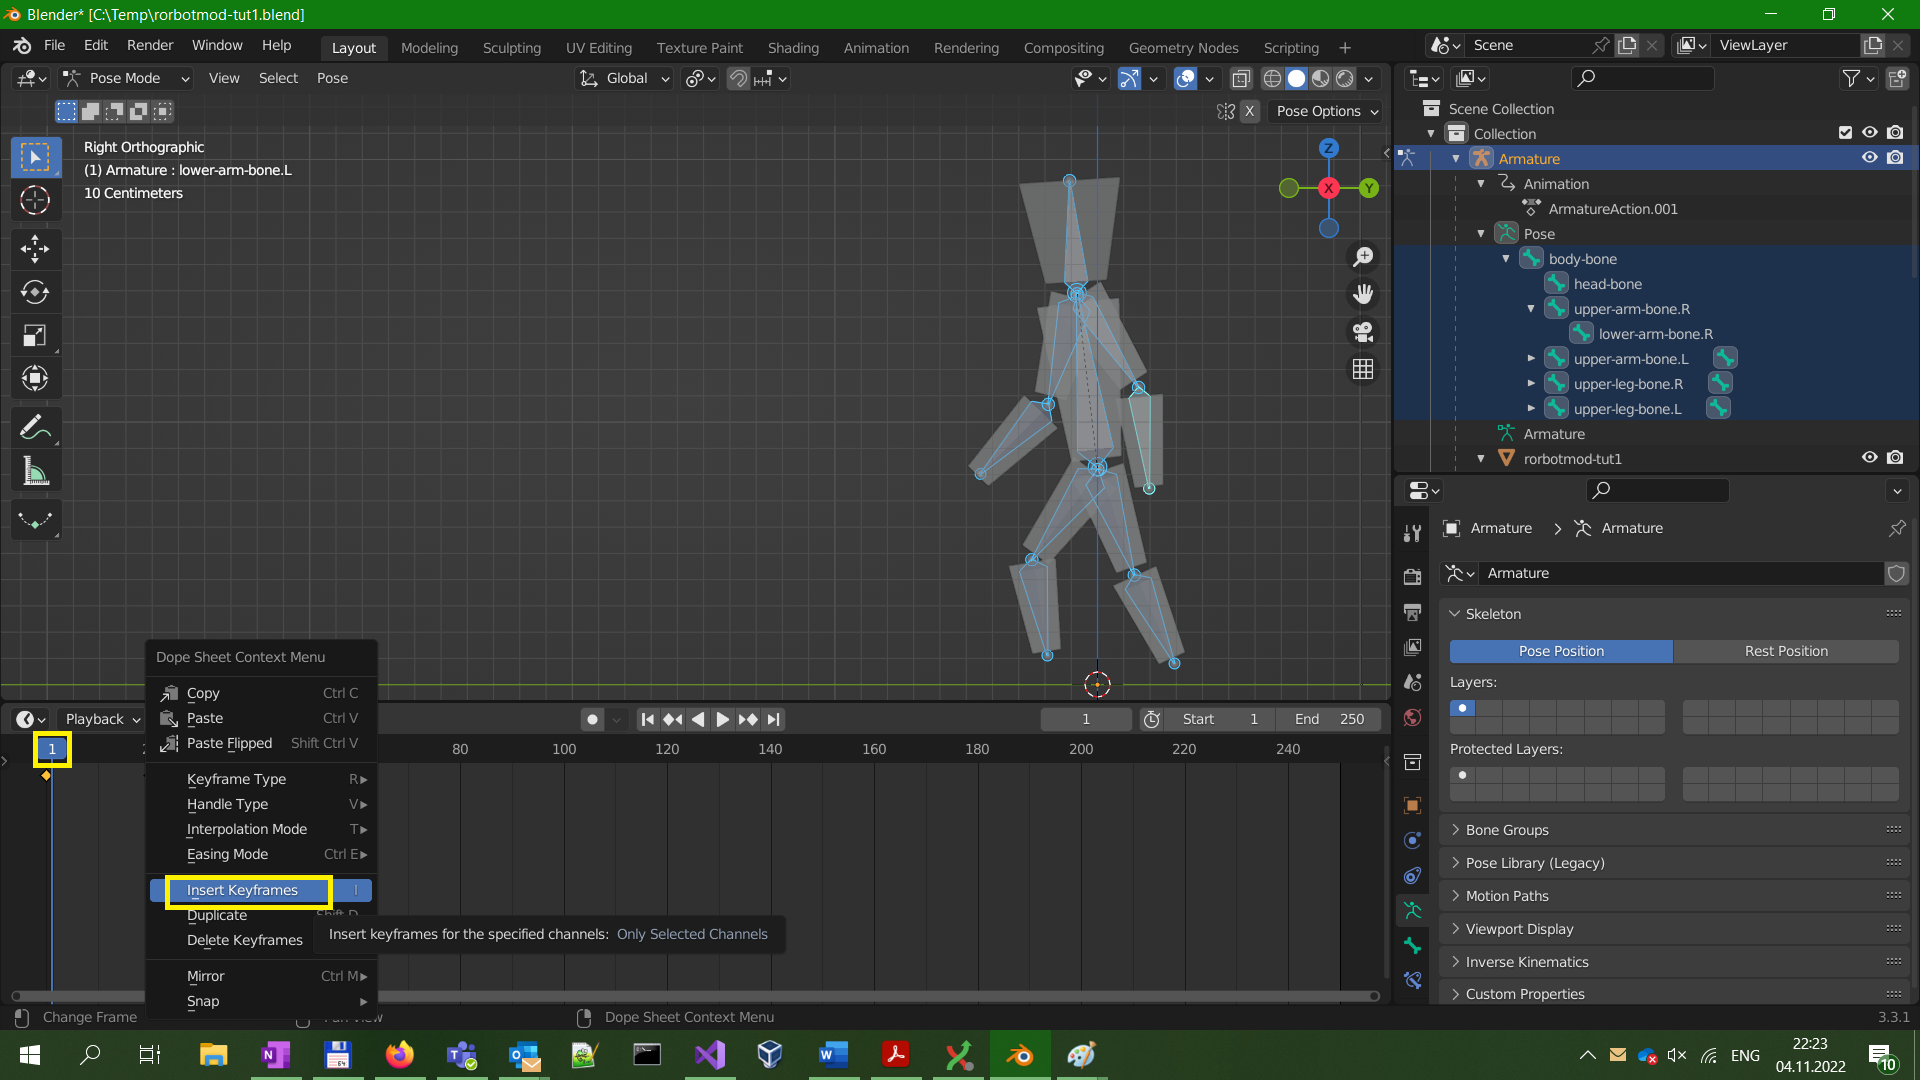
Now, we want to close the loop by returning from the current pose back to original pose. However, we can't just copy and paste the first keyframe because that would add a slight pause to the movement. We need to make the the final keyframe to be just before the initial pose. To do that, let's capture frame at position 1 and copy it to position 39. Move the slider in the Timeline window to position 1, right click the window and select "Insert keyframes".
- Status
- Not open for further replies.
